ELOTE - MEXICAN STREET CORN

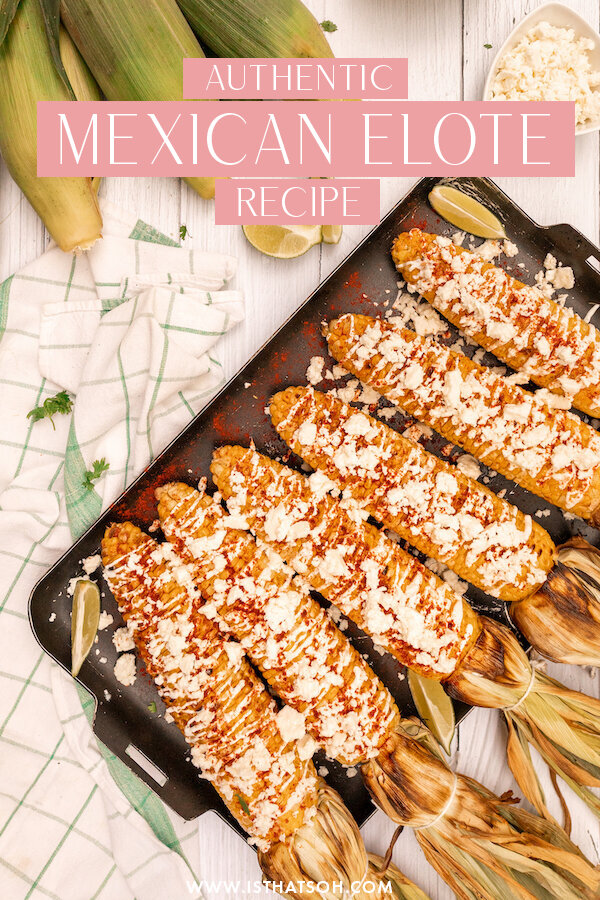
Elote or Mexican street corn is one of my favorite appetizers!! Whenever I go out for tacos I always have to order the Mexican street corn otherwise the dining experience isn't complete! The thing you might not realize is that it is so simple to make and you can do it so easily right at home. I made mine on the bbq this past week which I think was even better than boiling it because when you boil it you dilute the sugars in the kernels whereas if you bbq it, they get sealed in and the corn tastes extra sweet! Give it a go, you’ll be surprised just how delicious and easy it is to make.

INGREDIENTS:

Sweet Corn - Two per person is my usual estimate
Butchers Twine
2 TBSP of Vegetable Oil
Cream Fresh
Chipotle Chilli Seasoning Spice
Feta Cheese, Cotija Cheese or Queso Fresco
Lime Wedges - optional

DIRECTIONS:

Peel back the husk of corn and tie back with a piece of butchers twine

Coat corn in a light layer of oil and place on the bbq, turning frequently so that it becomes only slightly charred

When the corn is ready, drizzle with creme fresh, sprinkle with chipotle seasoning and garnish with cheese.

Serve warm with a slice of lime.

Enjoy!


I hope you enjoyed this recipe as much as I do. If you have any comments please leave them below and I'll be happy to answer them as soon as I can! Happy cooking!!!


PIN THIS POST

KOREAN PICKLED RADISH RECIPE

I am sure by now you can tell that I have recently developed a slight obsession with Korean food. Now having been introduced to Yangnyeom chicken by my boyfriend’s brother’s Korean girlfriend and already having a previous love for Bibimbap, I now wanted to start sharing recipes for some little side dishes that you often see being served with Korean food like this one, a simple Korean pickled radish dish. Unlike regular radish, Korean radish is massive in size and white on the outside as well as the inside. Usually served pickled along with other small side dishes, I find Korean pickled radish to be refreshing, almost like a palette cleanser that goes well with spicy dishes. Pickled korean radish can also be stored easily in the fridge for up to two weeks and made in batches which makes it easy to pull out during mealtime. We recently made Korean pickled radish to go with our Yangnyeom chicken dinner the other week and it was the best compliment for the dish! I think you will feel the same way also! Hope you like it!


INGREDIENTS:

- Pickled Korean Radish -

1 lbs of Korean Radish, peeled and cubbed
1/3 CUP of Sugar
1/3 CUP & 1 TBSP of White Vinegar
3/4 CUP of Water
1 TSP of Kosher Salt


CHECK OUT THESE OTHER ASIAN INSPIRED RECIPES!


DIRECTIONS:

Combine sugar, vinegar, salt, and water in a large glass pickling jar and give it a stir so that it can mix well.

Next, add in your cubed radish, seal with a lid, and place in the fridge.

Allow to ‘pickle’ for a minimum of 2 hours before serving.

Korean pickled radish can be stored in the fridge for up to two weeks.

P.S. This recipe is usually served and pairs really well with Korean Fried Chicken (pictured below).


FOLLOW ME ON INSTAGRAM @ISTHATSOH

Gallery Block
This is an example. To display your Instagram posts, double-click here to add an account or select an existing connected account. Learn more

I hope you enjoyed this pickled Korean radish recipe as much as I do. If you have any comments please leave them below and I'll be happy to answer them as soon as I can! Happy cooking!!!


PIN THIS POST

LEMON BLUEBERRY POUND CAKE WITH ICING

It’s August, which means blueberry season is upon us here in Canada and since the price of one of my favorite berries has become insanely affordable, I thought it would be fun to create a few recipes using them. One such recipe that I decided to make was this lemon, blueberry pound cake which, even without icing is still sweet, light, and amazing. The best part about pound cake is that you can always make it ahead of time and freeze it to enjoy at a later date as an after-dinner dessert or alongside your morning coffee. Further, since it stores so well, you can even make it in batches as a back up for when that unexpected guest drops by and you need something quick to offer them. Either way, I know you will enjoy it!

INGREDIENTS:

- Lemon Blueberry Pound Cake -

1.5 CUPS of All-Purpose Flour
1/8 TSP Baking Soda
1/4 TSP Salt
2 TBSP of Lemon Juice
Zest from 1 Lemon (try not to get to much of the white layer under the top layer as it is bitter)
1/2 a CUP of Unsalted Butter (bring to room temperature)
1.5 CUPS of Sugar
3 Eggs
1 TSP of Vanilla Extract
1/2 a CUP of Buttermilk
1/2 - 3/4 CUP of Blueberries (depending on how much blueberries you want)

- Lemon Icing Glaze -
2 TBSP of Lemon Juice
1.5TBSP of Buttermilk
1.25 CUPS of Icing Sugar

DIRECTIONS:

Preheat oven to 325 degrees.

Butter and flour your loaf pan - mine was 9x5 inches.

Next, in a bowl, sift in your flour, baking soda, and salt before mixing in your lemon zest and stiring until well incorporated.

In a separate bowl, add in your butter and 1/2 cup of sugar and using a hand mixer cream the sugar on medium speed. Continue to add sugar 1/2 cup at a time until fully incorporated.

Next add the eggs, one at a time until well incorporated. Once all eggs are in turn the speed up to high and beat the mixture till it becomes fluffy.

Once fluffy, reduce speed back to medium and add in lemon juice and vanilla.

Once well incorporated and fluffy you can now start to add in the flour mixture and buttermilk. Start with 1/3 of a CUP of flour followed by 1/4 Cup of Buttermilk and repeat until all the flour and buttermilk is incorporated.


Next, fold in blueberries using a spatula before moving the entire mixture to your loaf pan and baking for 85-95 minutes or until a toothpick comes out clean.

Allow the pound cake to cool in the pan before moving it to a cooling rack.

At this point, you can make the icing (optional) by combining the lemon juice and buttermilk together in a bowl before slowly incorporating the icing sugar.

One loaf has cooled, drizzle the lemon icing glaze on top of the loaf. Store in the fridge to help it harden before cutting and serving or wrap and move to the freezer for storage.

Enjoy!


I hope you enjoyed this recipe as much as I do. If you have any comments please leave them below and I'll be happy to answer them as soon as I can! Happy baking!!!


PIN THIS POST

HEALTHY-ISH SPICY KOREAN 'FRIED' CHICKEN (YANGNYEOM)

Yangnyeom (or Yum Yum chicken as we like to call it), is a fried Korean chicken recipe, usually served breaded, and coated in a red, spicy, Korean fried chicken sticky red sauce. My boyfriend’s brother’s Korean girlfriend recently made this fried Korean chicken for the family and we all loved the sweet-salty-spicy flavors. Since we are all health-conscious, slight changes were made to the typical traditional recipe (no flour, frying in oil, and less sugar) but the results were just as tasty. If you feel like making something unique and easy for dinner, I highly recommend giving this recipe a go. It pairs beautifully with Korean pickled radish, a bowl of sticky rice, and of course, a nice cold beer!

Enjoy!

INGREDIENTS:

- BBQ Chicken Marinade -
3 LBS of Drumsticks
Vegetable OIl (enough to coat chicken)

- Korean Sauce -
2 TBSP of Rice Vinegar
2 TSP Ginger (minced or grated)
3 TBSP of Ketchup
2 TBSP of Honey
2 TBSP of Brown Sugar
2 TBSP of Soya Sauce
2 TBSP of Garlic (minced or grated)
1 TBSP of Sesame Oil
2-2.5 TBSP of Hot Chilli Paste (Gochujang) *depending on how hot you want

- Garnish -
Roasted Sesame Seeds
Green Onions, finely shredded


CHECK OUT THESE OTHER ASIAN STYLE RECIPES


DIRECTIONS:

Coat the chicken in vegetable oil and bbq till they are cooked through.

In a deep saucepan or wok create your Korean Chicken Sauce and heat up over low to medium heat, stir well. Once it starts to bubble, reduce heat, add in your bbq chicken and toss until well coated in sauce.

Remove chicken from heat and garnish with roasted sesame seeds and green onion before serving.

Enjoy!

P.S. This recipe is usually served and pairs really well with Korean pickled radish (pictured below)!


FOLLOW ME ON INSTAGRAM @ISTHATSOH


I hope you enjoyed this spicy Korean chicken recipe as much as I do. If you have any comments please leave them below and I'll be happy to answer them as soon as I can! Happy cooking!!!


PIN THIS POST

LINGUINE ALLE VONGOLE - PASTA WITH CLAMS

Linguine alle Vongole (clams in Italian) or Spaghetti alle Vongole is a classic dish and one of the first dishes that I ever learned. This pasta alle vongole recipe was originally one of my friend’s moms and she used to make this for us when it was a little colder outside because of the broth base. This is a great and easy (not to mention inexpensive) seafood pasta recipe if you are a new cook. Remember to go easy on the salt as vegetable cubes have a lot of salt in them already and you are salting the water to boil your pasta which will be absorbed by your linguine.

Enjoy

INGREDIENTS:

Serves 2-3 People

4 TBSP of Olive Oil
4 TBSP of Fresh Parsley (chopped) *Save a little as a garnish
2 Large Garlic Cloves (minced)
1 Chopped Shallot (chopped finely)
½ TSP of Pepper
1 CUP of White Wine
1 Vegetable Cube - no need to use them to create a broth beforehand because we use the cubes to flavor the sauce
2 (10oz) Cans of Clams with Juice or 10 Clams Per Person
1 LBS of Cooked Linguine
Grated Parmesan as garnish (optional)
1 French Baguette (Optional)

*Feel free to cook and place a couple of fresh clams still in shells on top for extra esthetic.


CHECK OUT THESE OTHER PASTA DISHES


DIRECTIONS:

If using fresh clams, soak clams in lukewarm to cold water for 25 minutes before you start so they can open up and release the sand inside. Scrub shells lightly and set aside.

Next, fill a pasta pot with water and place on the stove to boil

Using a sauté pan heat your olive oil and sauté your shallots, garlic and parsley for 4-5 minutes until the shallots become translucent.

Next add the juice from the cans of clams (exempt if using fresh clams), wine and vegetable cube. Once the vegetable cube melts salt and pepper to taste.

Once the water is boiling, salt the water and add in your linguine. Make sure to save some pasta water before you drain it.

Allow to simmer for 10 minutes to reduce liquid before adding the clams from can and continuing to cook for an additional 5 minutes. If using fresh clams, add clam shells into sauce pan making sure none of them overlap (they wont open as well otherwise), cover and allow to simmer for 10 minutes (or until the majority of the shells are open) so that the clam water can release from shells and mix with the sauce. Once ready, taste the broth and make sure it is seasoned to you liking otheriwse add more salt and pepper.

Drain pasta and toss it in clams and sauce while adding about 1-2 TBSP of pasta water to thicken it. Garnish with parsley and serve.

I love adding and recommend trying this dish with Parmesan but you can do whatever you like.


FOLLOW ME ON INSTAGRAM @ISTHATSOH

Gallery Block
This is an example. To display your Instagram posts, double-click here to add an account or select an existing connected account. Learn more

I hope you enjoyed this spaghetti alla vongole recipe as much as I do. If you have any comments please leave them below and I'll be happy to answer them as soon as I can!  Bon Appetito!!!


PIN THIS POST