KOREAN KIMCHI PANCAKES (KIMCHIJEON) WITH DIPPING SAUCE - A YUMMY KOREAN STREET FOOD RECIPE

Korean kimchi pancakes (often referred to as kimchijeon in Korea) are a delicious street food dish often enjoyed as a snack or after a night out, that is so easy to make at home! To tell you the truth, it’s just like making traditional pancakes where you add everything together in a bowl and fry it up except Korean Kimchi Pancakes are way more savory than your traditional North American pancake thanks to the addition of green onions and some spicy kimchi! If you enjoy Korean food and want to learn how to make delicious kimchi pancakes at home, check out this foolproof recipe with dipping sauce below!

IS KIMCHI VEGAN?

It all depends on the brand you buy! Traditional kimchi does contain fish sauce but depending on the brand you buy you can also find it without, so make sure to check the ingredient list. Additionally, Kimchi is not difficult to make, so if you want to try making it at home you can just leave out any animal products to make it vegan.

In my opinion, the best kimchi brand is Myungga Mat Kimchi however, I did recently do a Whole 30 cleanse and found a plant-based kimchi brand called LIVE at Ambrosia that I very much enjoy. It doesn’t have any added fish sauce and uses apple for sweetness instead of sugar. *NOTE: This recipe is not whole 30!

WHAT ARE SOME KIMCHI BENEFITS?

Kimchi is so good for your gut! It aids with digestion and is packed full of great probiotics. It is also said to help with inflammation, aid with weight loss, strengthen your immune system and support heart health!

DOES KIMCHI GO BAD

Yes! I recently had to throw out the remnants of a jar of kimchi that was a month or so old. You could tell by the way it smelled that it had ‘over fermented’. It smelled like a bottle of wine that has been sitting out for a few days. If you open your jar and it smells kind of sour with a pungent alcohol smell - it’s most likely gone bad.

* Please Note - Some links in this post may be affiliate links *

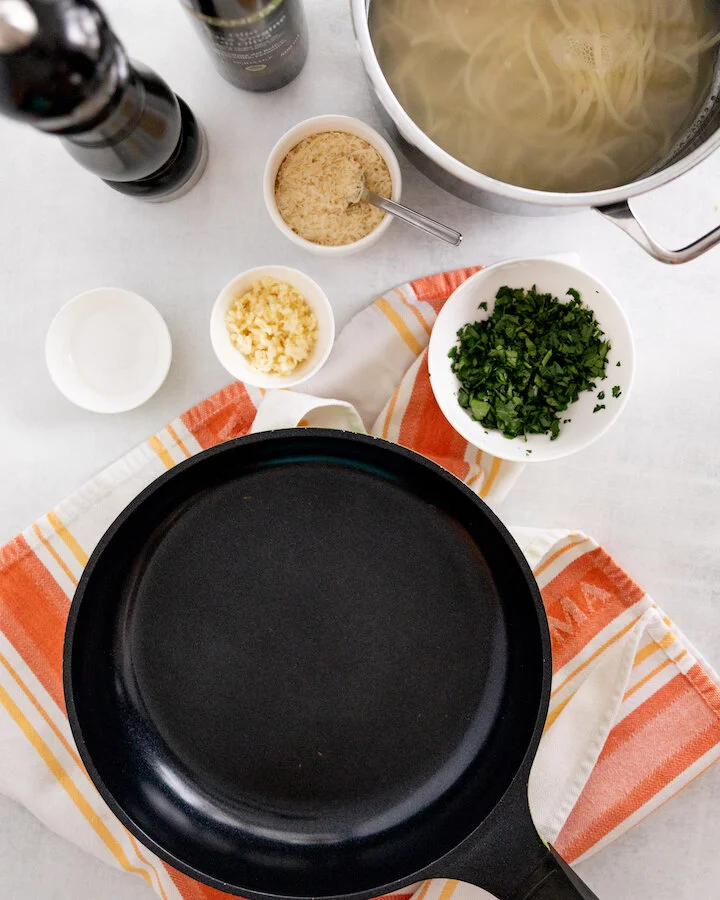
INGREDIENTS FOR KIMCHI PANCAKES:

Makes 2-3 Pancakes

3-4 Green Onions (chopped diagonally) - set a little aside for garnish
1/2 a CUP of Kimchi (chopped) *Use a plant-based Kimchi if you want this recipe to be vegan!
1/2 a CUP of Korean Pancake Mix
2-3 TBSP of Kimchi Juice and/or Korean Chili Paste
About 1 Cup of Water (to be added a 1/4 CUP at a time)
1-2 TBSP of Vegetable Oil
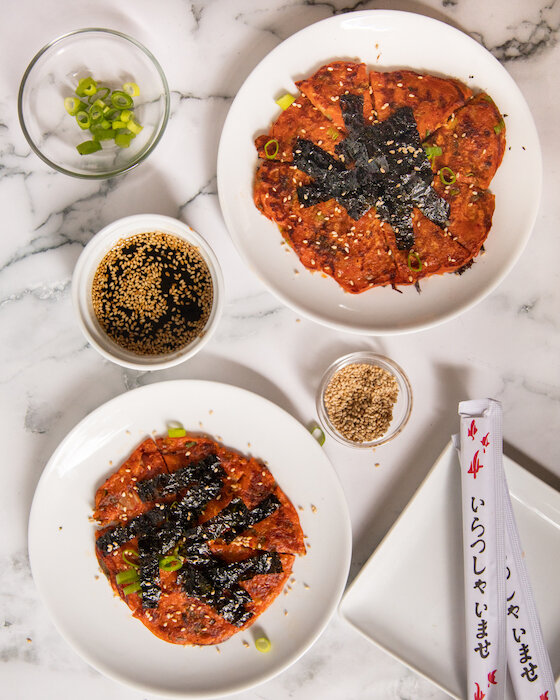
- Garnish -
1 TBSP of Seasame Seeds (roasted)
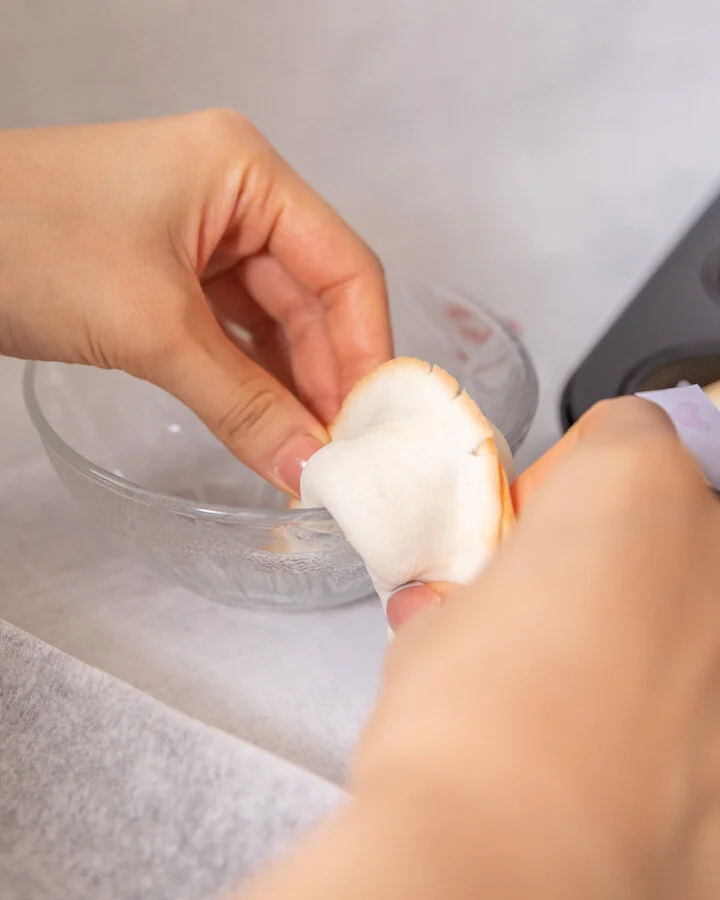
Dried Seaweed (cut into 2-inch strips)

- Dipping Sauce -

2 TBSP of Soya Sauce
1 TBSP of Water
2 TSP of Rice Vinegar
1 TSP of Sugar
2 TSP of Sesame Oil
1 TSP of Sesame Seeds


CHECK OUT THESE OTHER ASIAN INSPIRED RECIPES


HOW TO MAKE KIMCHI PANCAKES:

In a small bowl, add all your dipping sauce ingredients, and using a fork mix it together before setting it aside.

In a bowl add in your green onions (making sure to put some to the side for a garnish later), Korean pancake mix, kimchi, and kimchi juice/ Korean chili paste in a bowl. Stir in a 1/4 cup of water at a time until a batter starts to form. You want it to be the same consistency as a regular pancake mix so keep adding water until you achieve this desired consistency.

Heat up 1-2 TBSP of vegetable oil in a pan and pour in your Kimchi pancake batter when hot. Allow the Kimchi pancake to cook on one side for 2-3 minutes before flipping - same as you would a regular pancake.

When ready, remove from heat, garnish with sesame seeds, more green onion, and dried seaweed strips.

Serve with dipping sauce.


FOLLOW ME ON INSTAGRAM @ISTHATSOH


I hope you enjoyed this easy vegan kimchi pancake recipe with dipping sauce as much as I do. If you have any comments about how to make kimchi pancakes, please leave them below and I'll be happy to answer them as soon as I can! Happy cooking!!!


PIN THIS POST

TASTY CINNAMON ROLLS RECIPE!

Growing up I used to take the subway home from school and everytime the train would pass through one particular station, the smell of freshly baked, glazed cinnamon rolls would fill the car. I would have to practically hold myself down to stop me from getting off the train, running up the stairs and spending my allowance on one (soemthing I allowed myself to do on occasion). To this day, cinnamon rolls always remind me of simpler times and so I have begun to make them at home.

To me, the best traits of a tasty cinnamon roll is that it’s super fluffy, with an almost gooey center, has a flavourful cinnamon rich filling and of course, a decadent cream cheese icing. If this sounds good to you, you’re going to love this tasty cinnamon rolls recipe!

* Please Note - Some links in this post may be affiliate links *

INGREDIENTS:

Makes 9-12 Rolls
Time:
30 Min for Yeast to Activate, 1.5 Hours for Dough to Rise, 1 Hour for Rolls to Double, 35 Minutes for Cooking

Cinnamon Roll Dough
1 CUP of Warm Milk
1 TBSP of Vanilla Extract
2.5 TSP of Instant Dry Yeast
1/2 TSP of Salt
2 Eggs - at room temperature
1/3 CUP of Unsalted Butter - melted
1/2 a CUP of White Sugar
3.5 CUPS of All Purpose Flour
Pinch of Ground Nutmeg
1 TSP of Ground Cinnimon
Olive Oil - for greasing the bowl

Cinnimon Roll Filling

1 CUP of Brown Sugar
2 TBSP of Cinnamon
1/2 TSP of Nutmeg
1/3 CUP of Softened Unsalted Butter

Optional Topping While Baking

3/4 Cup of Heavy Cream

Cream Cheese Icing For Cinnamon Buns

4 OZ of Cream Cheese - softened
1/4 CUP of Unsalted Butter - softened
1 TSP of Vanilla
1/8 TSP of Salt
1.5 CUP of Powdered Sugar - sifted
2-4 TBSP of Half and Half (or Milk)


CHECK OUT THESE OTHER SWEET RECIPES


HOW TO MAKE CINNAMON BUNS:

Cinnamon Roll Dough

The first thing you need to do is make the cinnamon roll dough. In a mixing bowl, dissolve sugar in the warm milk before sprinkling in the yeast. Allow the yeast to proof until it rises, thickens and bubbles.

When ready whisk in eggs, vanilla, melted butter, and salt.

In a separate bowl, combine remaining dry ingredients - flour, cinnamon, and nutmeg - with sugar. Whisk until well incorporated.

Place mixing bowl with wet ingredients on your stand mixer and using a dough hook, gradually add the flour mixture to it about 1/2-1 CUP at a time.

Once a dough starts to form, remove mixture from the mixing bowl onto a floured surface and knead gently until a soft dough is formed that is no longer sticky.

Place the dough in a bowl greased with olive oil. Cover dough with a cloth or kitchen town and place somewhere warm where it will not be disturbed, to rise until it doubles in size (approximately 45 minutes to 1 hour).

Once dough has doubled in size, you are ready to preheat the oven to 350 degrees, grease a baking dish with butter ( around 9x9 inches), and prep your work surface with flour.

Cinnamon Roll Filling

Next, we need to make the cinnamon roll filling! In a bowl, combine the cinnamon, nutmeg, and sugar, and whisk together until well incorporated.

Roll out dough into a rectangular shape on floured surface until 1.4 inch thick.

Spread the butter out evenly on the surface of the dough before sprinkling the filling gernerously on top. Make sure to stay 1 inch away from one of the shorter edges of the rectangle.

When ready, start to gently roll the dough into a log starting from the opposite end of the unbuttered edge

Using a piece of unflavored and unscented dental floss cut rolls into 1.5 inch thick rolls.

Place rolls in your buttered baking dish allowing for room for them to expand further. When done, cover again with a cloth and place the rolls in a warm spot so they can again double in size.

Bake rolls for 7-10 minutes. Take out the roll and top each roll with a few tablespoons of heavy cream. This is optional but it does help them become super gooey and fluffy, so if you like fluffy cinnimon rolls I highly recommend doing this step! Return the rolls to the oven and continue to bake until they become a deep golden brown (approximately 25 minutes). If the rolls are getting a bit too brown at the 20 minute mark, I recommend covering them loosely with a sheet of foil and allowing them to continue to bake.

When done, remove baking dish from oven and allow to cool.

Cream Cheese Icing For Cinnimon Buns

While the rolls are cooling you can now work on the cream cheese icing for the cinnimon buns!

Whisk together cream cheese, butter, vanilla, 2 TBSP of half and half (or milk), and Salt in a bowl. Add in your powdered sugar bit by bit until fully incorporated. NOTE: You can use half and half (or milk) and confection sugar to adjust the frosting consistency to how you desire.

Spread the frosting over the warm tasty cinnamon rolls and serve! Keep rolls covered and refrigerated when storing.

Enjoy!


FOLLOW ME ON INSTAGRAM @ISTHATSOH


I hope you enjoyed this ‘tasty cinnamon rolls with cream cheese icing’ recipe as much as I do. If you have any comments please leave them below and I'll be happy to answer them as soon as I can! Happy baking!!!


PIN THIS POST

SPAGHETTI AGLIO E OLIO - A SIMPLE ITALIAN CLASSIC

Leave it to the Italians to create an incredibly flavourful pasta dish using only a few inexpensive ingredients! This absolute classic is one of my all-time favs and takes less than 10 minutes to whip up. In my household, we like to serve it alongside meat dishes like my mom’s coveted rack of lamb recipe or occasionally by itself with a few added shrimp on top! If you are looking for a quick, student-friendly pasta dish to whip up or something to add to a protein as a side, you can’t go wrong with a simple yet flavorful dish like this one!

* Please Note - Some links in this post may be affiliate links *

INGREDIENTS:

Serves 4 People

2 TBSP of Olive Oil
4 Cloves of Garlic - Minced
1 Pack of Spaghetti - cooked al dente
Italian Parsley - Roughly Chopped
Parmesan Cheese - Grated
Salt and Pepper

You can also add chilli flakes to make it a little spicy or a few shrimp!


CHECK OUT THESE OTHER DELICIOUS ITALIAN RECIPES


DIRECTIONS:

Bring water to a boil on the stove, salt, and cook your pasta.

When pasta is almost ready, heat up your olive oil on medium heat in a large skillet. When hot, add in your garlic and cook for 2-3 minutes. If you like a little spice, feel free to add in some chili peppers too.

Once garlic is fragrant, add in your cooked pasta, sprinkle on some grated parmesan, and some roughly chopped parsley.

Salt and pepper to taste and serve with more parmesan on the side.

Enjoy!


FOLLOW ME ON INSTAGRAM @ISTHATSOH


I hope you enjoyed this recipe as much as I do. If you have any comments please leave them below and I'll be happy to answer them as soon as I can! Happy cooking!!!


PIN THIS POST

HOMEMADE FORTUNE COOKIES

Thinking of making a customizable treat for someone in your life? Perhaps Valentine’s Day is coming up, maybe you want to cheer a friend up or you need the perfect gift for your anniversary. Look no further than this easy to personalize fortune cookies recipe! Not only can you leave super cute handwritten notes for someone inside or notes of encouragement but the cookies themselves are pretty addictive! When creating my fortune cookies I noticed that it is important to work quick which is why I recommend making your notes or messages ahead of time and having them already prepared. Additionally, when creating customized fortune cookies, you want to make sure you don’t make the batter too thick so that they dont turn into mini pancakes. Instead, spoon out as much as you need and spread it out in a circular motion so you can almost see the parchment paper underneath. Lastly, I would also recommend creating only making two fortune cookies at a time as you need to work fast and it can get harder the more you make at one time. Enjoy!

* Please Note - Some links in this post may be affiliate links *

INGREDIENTS:

Makes about 20 Fortune Cookies


4 Egg Whites
1 Cup of Flour
1 Cup of Sugar
4 TBSP of Water
2TSP of Almond Extract

You will also need:
Hand Mixer
Whisk
Medium Size Bowl
Baking Tray
Parchment Paper
Muffin Tray


CHECK OUT THESE OTHER GREAT RECIPE GIFT IDEAS!


DIRECTIONS:

Write out your ‘fortunes’ on strips of paper 4.5-5 inches in length.

Preheat oven to 400 degrees.

In a medium size bowl, beat egg whites with a hand mixer until stiff peaks form .

Add in your flour, sugar and almond extract, and mix with a whisk until it turns into a paste.

Add in your water and continue to combine with a whisk.

Line a baking tray with parchment paper and make circles with the mixture about 4.5 inches in diameter. You don’t want to do more than three at a time (I found my sweet spot to be 2) and don’t make them too thick or else they will come out like pancakes. So make sure they are thin!

Bake for 4 minutes or until edges brown slightly.

Remove from oven allowing to cool for 5 seconds before quickly but carefully pealing the pancake off the parchment and folding it in half with one of the notes inside. Pinch the sides together before folding it in half again using a cup or a lip of a bowl (see below photo for demo).

Place in muffin tray to cool and harden.

Flip parchment paper over and repeat. NOTE: You don’t want to use a piece of parchment paper more than twice otherwise the cookies start to stick to the paper.


FOLLOW ME ON INSTAGRAM @ISTHATSOH


I hope you enjoyed this homemade fortune cookies recipe as much as I do. If you have any comments please leave them below and I'll be happy to answer them as soon as I can! Happy baking!!!


PIN THIS POST

CHOCOLATE RICE KRISPIE TREATS FOR VALENTINE'S DAY

If you are looking for a fun Valentine’s Day recipe that is not only adorable but easy and fun to make, I highly recommend trying this chocolate rice krispie treats recipe!

When it comes to the best rice krispie treats recipe this one takes the cake because they are so incredibly soft and chewy! Of course, the steps for this recipe are the same for regular rice krispie squares but I thought using a heart cookie cutter would be a great fit for Valentine’s Day. This recipe for chocolate rice krispies will have you reminiscing about childhood bake sales and exchanging Valentine’s day cards with friends. Speaking of exchanging, they are also super fun to decorate and make a great gift so my advice is to double the recipe and giving a few away! Enjoy!

* Please Note - Some links in this post may be affiliate links *

INGREDIENTS:

Makes Apx 12 Hearts

1/2 CUP of Unsalted Butter
5 Cups of Marshmallows - separated into two portions - 1 of 4 Cups and 1 of 1 Cup.
6 Cups of Rice Krispies Cereal
1.5 TSP of Vanilla Extract
2.5 CUPS of White Chocolate Wafers
Pink Food Colouring

You Will Also Need:
Heart-Shaped Cookie Cutter
Baking Tray
Wax Paper


CHECK OUT THESE OTHER FUN VALENTINE’S DAY RECIPES


DIRECTIONS:

In a large sauce pan melt the butter on medium heat.

Once melted add in 4 cups of marshmallows and reduce heat to low. Continue stirring until completely melted.

Next, remove melted marshmallow and butter mixture from heat and add to large bowl with the Rice Krispie cereal, remaining marshmallows and vanilla extract. Mix until well incorporated.

Using wax paper, line a baking tray and press the rice crispy into the baking tray creating an even thickness all round. Place the baking tray in the fridge for 20 min to cool before removing and cutting out heart shapes using a heart shaped cookie cutter. Place the hearts on a wax paper lined baking sheet. NOTE: You can take the remainder of the mixture that you were not able to use and press it into the heart shaped cookie cutter to create 1 or 2 more heart shapes so you don’t have to waste any of the precious mixture.

Using the ‘double boil’ method, melt the white chocolate wafers. Set 1/2 aside and add a ladybug size amount of pink food colouring to it. Stir well to turn the chocolate pink.

Dip each heart into either the white or pink chocolate until half the heart is submerged before placing it back on the baking sheet to dry. You can also use a fork or piping bag to create decorative patterns on top using alternating chocolate colours.

Store hearts in cool place until you are you are ready to enjoy.

chocolate rice crispy treats
)

FOLLOW ME ON INSTAGRAM @ISTHATSOH


I hope you enjoyed this chocolate rice krispie treats recipe as much as I do. If you have any comments or suggestions about how to make rice krispy treats please leave them below and I'll be happy to answer them as soon as I can! Happy baking!!!


PIN THIS POST

chocolate rice crispy treats