THE CAKE YOU DIDN'T KNOW YOU WERE MISSING - OLIVE OIL CAKE!

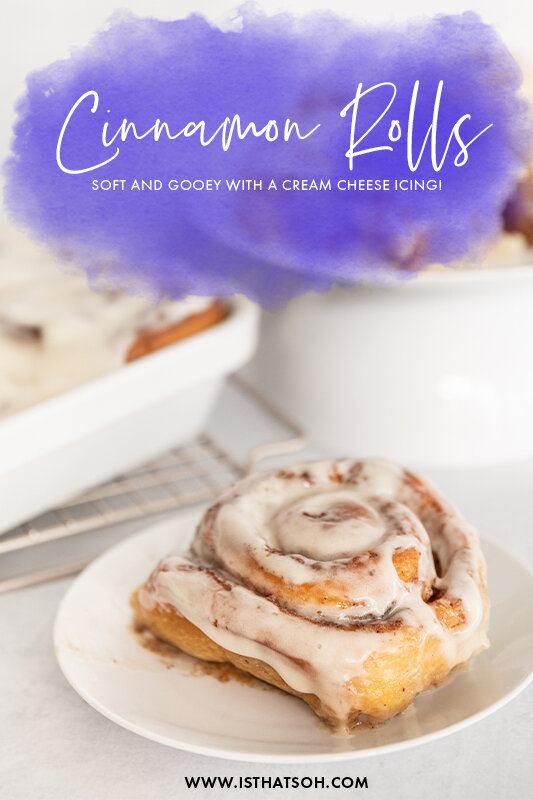
First of all, full disclosure - this Olive Oil Cake recipe was not an original recipe created by me but the joke about this cake with olive oil is that the direction for the original recipe are so confusing and convoluted that the first few times we made it, we did it wrong! LOL Has that ever happened to you? The even funnier bit of the story though was that everyone though the ‘wrong’ versions of this Olive Oil Cake was even better then the original/right version!!! They say baking is a science but in the case of this recipe, it only gets better the more you screw up! HAHA!

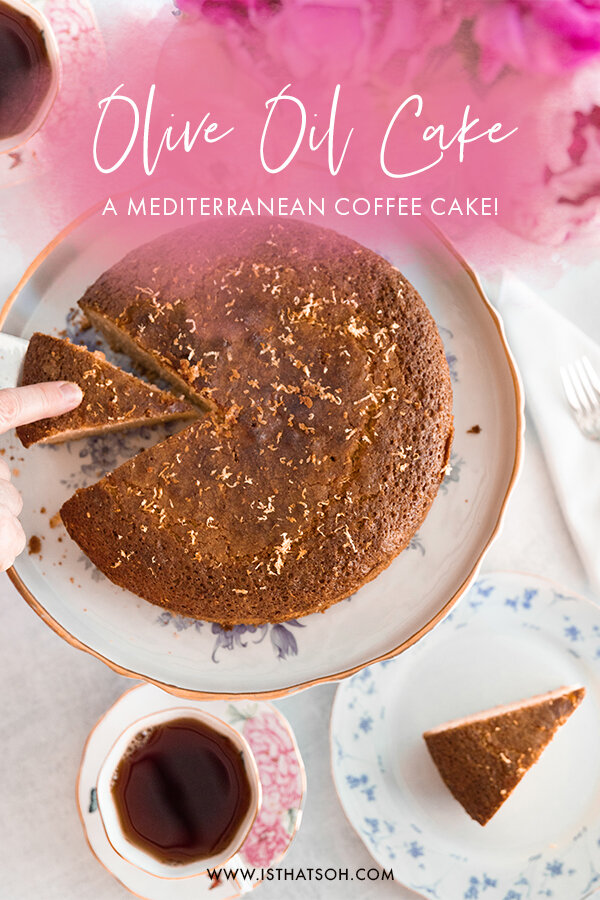
Anyways, the first time I heard of ‘olive oil cake’ I was not enthusiastic at all. The name to me is not appealing AT ALL and I was shooketh at just how amazing it actually. A staple in most Mediterranean kitchens, Olive Oil Cake is a light and airy cake, perfect for serving with tea or coffee as an afternoon snack. It isn’t overly sweet (even with the sugar topping) and when garnished with lemon zest (or any citrus works really) its delightful without being over powering. Also, since we used a bit of almond flour, the texture came out so moist! Perfect for dipping!

Anyways, I know you are going to just love this cake if you can just get past the name like I did so instead of doing a recipe review like I would normally with a recipe that is not mine, I have tweeked it so that the directions are much easier to follow AND so that you can have the benefits of our beautiful mistakes! Enjoy!

* Please Note - Some links in this post may be affiliate links *

INGREDIENTS:

Serves 8

- Spring Pan Prep -
2 TBSP of Olive Oil
2 TBSP of Sugar

- Cake Mix -

2 Cups of Cake Flour
1/3 Cup of Almond Flour
2 TSP of Baking Powder
1/2 TSP of Baking Soda
1/2 TSP of Kosher Salt

3 TBSP of Cointreau or other liquer like Grand Marnier, Amaretto or Sweet Vermouth
3 TBSP of Lemon Juice
2 TSP of Vanilla

3 Eggs
1 TBSP of Lemon Zest
1 Cup of Sugar

1.25 Cups of Olive Oil

- Extras -

2 TBSP of Sugar
2 TBSP of Olive Oil

- Optional Garnish -
1 TBSP of Lemon Zest

You will also need a hand mixer, 9 inch springform pan and parchment paper!


CHECK OUT THESE OTHER DESSERT RECIPES


DIRECTIONS:

Preheat oven to 400!

NOTE: After placing the cake in the oven reduce the heat to 350!

Prepare your spring form pan by coating it (sides too) with olive oil and lining the bottom with parchment paper. Coat parchment paper with more olive oil.

Sprinkle pan with sugar and coat evently, tap out any excess.

In a medium size bowl, mix the flour, almond flour, baking soda, baking powder, and salt in a bowl using a whisk. Eliminate any lumps that you see.

In another smaller bowl, mix together the cointreau, lemon juice, and vanilla.

In your largest bowl, beat eggs, lemon zest, and one cup of sugar together with a hand mixer at high speed until the mixture is very light/pale in colour - about 5 minutes

While still mixing on high speed, slowly stream in you olive oil until well incorporated and mixture thickens further.

Next, reduce your hand mixer speed to low and add in 1/3 of your flour mixture before alternating back and forth with 1/2 of the Cointreau mixture. You should start and end with the flour mixture!

Using a spatula, scrape the sides of bowl and fold in so everything is well incorporated before pouring the olive oil cake batter into the prepared pan.

Smooth the top out toward the edges from the middle before sprinkling the top with a little extra sugar! This is going to make it nice and golden brown.

Place pan in oven (remember to reduce the heat to 350!) and bake until golden brown - about 45 -50 minutes or until tester comes out clean.

Transfer cake to a wire rack to cool for 10 minutes before releasing the springform. You may want to run the edge of the pan with a knife to help loosen the cake from the sides of the pan

Poke holes on the top of the cake with a toothpick and drizzle 2 TBSP of olive oil into the cake and let it absorbe before serving.

OPTIONAL: You may want to sprinkle the top of the cake with extra lemon zest for garnish/decoration!

Enjoy!


FOLLOW ME ON INSTAGRAM @ISTHATSOH


I hope you enjoyed this olive oil cake recipe as much as I do. If you have any comments about this olive oil cake please leave them below and I'll be happy to answer them as soon as I can! Happy baking!!!


PIN THIS POST

TASTY CINNAMON ROLLS RECIPE!

Growing up I used to take the subway home from school and everytime the train would pass through one particular station, the smell of freshly baked, glazed cinnamon rolls would fill the car. I would have to practically hold myself down to stop me from getting off the train, running up the stairs and spending my allowance on one (soemthing I allowed myself to do on occasion). To this day, cinnamon rolls always remind me of simpler times and so I have begun to make them at home.

To me, the best traits of a tasty cinnamon roll is that it’s super fluffy, with an almost gooey center, has a flavourful cinnamon rich filling and of course, a decadent cream cheese icing. If this sounds good to you, you’re going to love this tasty cinnamon rolls recipe!

* Please Note - Some links in this post may be affiliate links *

INGREDIENTS:

Makes 9-12 Rolls
Time:
30 Min for Yeast to Activate, 1.5 Hours for Dough to Rise, 1 Hour for Rolls to Double, 35 Minutes for Cooking

Cinnamon Roll Dough
1 CUP of Warm Milk
1 TBSP of Vanilla Extract
2.5 TSP of Instant Dry Yeast
1/2 TSP of Salt
2 Eggs - at room temperature
1/3 CUP of Unsalted Butter - melted
1/2 a CUP of White Sugar
3.5 CUPS of All Purpose Flour
Pinch of Ground Nutmeg
1 TSP of Ground Cinnimon
Olive Oil - for greasing the bowl

Cinnimon Roll Filling

1 CUP of Brown Sugar
2 TBSP of Cinnamon
1/2 TSP of Nutmeg
1/3 CUP of Softened Unsalted Butter

Optional Topping While Baking

3/4 Cup of Heavy Cream

Cream Cheese Icing For Cinnamon Buns

4 OZ of Cream Cheese - softened
1/4 CUP of Unsalted Butter - softened
1 TSP of Vanilla
1/8 TSP of Salt
1.5 CUP of Powdered Sugar - sifted
2-4 TBSP of Half and Half (or Milk)


CHECK OUT THESE OTHER SWEET RECIPES


HOW TO MAKE CINNAMON BUNS:

Cinnamon Roll Dough

The first thing you need to do is make the cinnamon roll dough. In a mixing bowl, dissolve sugar in the warm milk before sprinkling in the yeast. Allow the yeast to proof until it rises, thickens and bubbles.

When ready whisk in eggs, vanilla, melted butter, and salt.

In a separate bowl, combine remaining dry ingredients - flour, cinnamon, and nutmeg - with sugar. Whisk until well incorporated.

Place mixing bowl with wet ingredients on your stand mixer and using a dough hook, gradually add the flour mixture to it about 1/2-1 CUP at a time.

Once a dough starts to form, remove mixture from the mixing bowl onto a floured surface and knead gently until a soft dough is formed that is no longer sticky.

Place the dough in a bowl greased with olive oil. Cover dough with a cloth or kitchen town and place somewhere warm where it will not be disturbed, to rise until it doubles in size (approximately 45 minutes to 1 hour).

Once dough has doubled in size, you are ready to preheat the oven to 350 degrees, grease a baking dish with butter ( around 9x9 inches), and prep your work surface with flour.

Cinnamon Roll Filling

Next, we need to make the cinnamon roll filling! In a bowl, combine the cinnamon, nutmeg, and sugar, and whisk together until well incorporated.

Roll out dough into a rectangular shape on floured surface until 1.4 inch thick.

Spread the butter out evenly on the surface of the dough before sprinkling the filling gernerously on top. Make sure to stay 1 inch away from one of the shorter edges of the rectangle.

When ready, start to gently roll the dough into a log starting from the opposite end of the unbuttered edge

Using a piece of unflavored and unscented dental floss cut rolls into 1.5 inch thick rolls.

Place rolls in your buttered baking dish allowing for room for them to expand further. When done, cover again with a cloth and place the rolls in a warm spot so they can again double in size.

Bake rolls for 7-10 minutes. Take out the roll and top each roll with a few tablespoons of heavy cream. This is optional but it does help them become super gooey and fluffy, so if you like fluffy cinnimon rolls I highly recommend doing this step! Return the rolls to the oven and continue to bake until they become a deep golden brown (approximately 25 minutes). If the rolls are getting a bit too brown at the 20 minute mark, I recommend covering them loosely with a sheet of foil and allowing them to continue to bake.

When done, remove baking dish from oven and allow to cool.

Cream Cheese Icing For Cinnimon Buns

While the rolls are cooling you can now work on the cream cheese icing for the cinnimon buns!

Whisk together cream cheese, butter, vanilla, 2 TBSP of half and half (or milk), and Salt in a bowl. Add in your powdered sugar bit by bit until fully incorporated. NOTE: You can use half and half (or milk) and confection sugar to adjust the frosting consistency to how you desire.

Spread the frosting over the warm tasty cinnamon rolls and serve! Keep rolls covered and refrigerated when storing.

Enjoy!


FOLLOW ME ON INSTAGRAM @ISTHATSOH


I hope you enjoyed this ‘tasty cinnamon rolls with cream cheese icing’ recipe as much as I do. If you have any comments please leave them below and I'll be happy to answer them as soon as I can! Happy baking!!!


PIN THIS POST

CLOUD BREAD *GLUTEN FREE & KETO FRIENDLY*

I know what you are thinking… Cloud bread? What is cloud bread? Well, it is a super fluffy, soft, delicious bread made from three ingredients! I first came across a cloud bread recipe while on TikTok and the fluffiness and name instantly caught my eye. Not only is it super easy and quick to make but keto-friendly, gluten-free, and so versatile - you can use it as a base for a pizza, or for your eggs at breakfast, etc. Best of all, it’s so delicious and I know you are going to love it just as much as I do! If you are wondering how to make cloud break and want an easy cloud bread recipe that is keto-friendly, check mine out below!

Enjoy!

CLOUD BREAD INGREDIENTS:

Makes 6-8 Pieces

3 Eggs - room temperature
3 TBSP of Cream Cheese - room temperature
1/4 TSP of Cream of Tartar


CHECK OUT THESE OTHER EASY KETO RECIPES


HOW TO MAKE CLOUD BREAD - DIRECTIONS:

Preheat oven to 300 and line a baking sheet with parchment paper.

In two medium-size bowl, separate the eggs, putting the yolk in one bowl and the whites in another.

Using a hand mixer, beat the egg whites on a low-medium speed until bubbles start to form before adding in the cream of tartar. When ready, turn the speed up to high on the hand mixer and continuing to whip egg whites until stiff peaks start to form.

Next, in the bowl with the yolks, add in the cream cheese and beat until blended and smooth.

Next, fold the bowl with your egg whites into the bowl with the yolks and cream cheese. Try not to over mix because you will deflate your cloud bread.

When ready, scoop a dollop of the batter using a large spoon onto your baking sheet and bake for 20-30 until medium golden brown.


FOLLOW ME ON INSTAGRAM @ISTHATSOH

Gallery Block
This is an example. To display your Instagram posts, double-click here to add an account or select an existing connected account. Learn more

I hope you enjoyed this TikTok cloud bread recipe as much as I do. If you have any comments please leave them below and I'll be happy to answer them as soon as I can! Happy cooking!!!


PIN THIS POST

CAULIFLOWER HASH BROWN EGG BITES

Always on the look out for a keto friendly recipe, these cauliflower hash brown egg bites are the perfect addition to your weekly breakfast line up. If you are looking for something to batch make that is not only low carb but also gluten free, you have to try this recipe. Not only are they delicious but you can add a variety of toppings to them like smoke salmon and chives or ham and tomato. Plus, they are packed full of protein so you can feel good about starting your day off on the right foot. Enjoy!

INGREDIENTS:

Makes 9 Cups

500 Grams of Frozen Riced Cauliflower - defrosted
1 Large Egg - whisked
1/2 CUP of Cheddar Cheese
1/2 Cup of Parmesan
1 TSP of Salt
1/2 TSP of Garlic Powder
Pepper to Taste
9 Eggs

Additional Toppings - Optional
Chili Pepper Flakes
Green Onion
Chives

DIRECTIONS:

Preheat oven to 350 and butter your muffin tray really well! If you don’t it will be hard to remove the cauliflower cups later.

In a large bowl, microwave your cauliflower for 8 minutes. Remove and let rest of 5 minutes before putting it a cheesecloth or tea towel to squeeze out as much liquid as possible. There is a lot of excess water in cauliflower so you will need to squeeze it really hard!

Next, in a large bowl, add in your whisked egg, cauliflower, cheddar cheese, parmesan, salt, and garlic powder and mix well using your hands.

Take your cauliflower mixture and press it into your muffin tray to form your ‘cups’.

When ready, place muffin tray in the oven and bake for 15-20 until the cups are golden and edges are brown.

Remove from oven, add in one egg to each cup, sprinkle salt and pepper to taste on top before placing back into the oven for another 10-15 minutes or until whites are set.

When done, remove from oven and allow egg bites to sit for 5 minutes before taking a knife and sliding it around the edge of each muffin mold to help remove the egg bites from the tray.

Add your desired garnishes and serve.

Enjoy!


I hope you enjoyed this recipe as much as I do. If you have any comments please leave them below and I'll be happy to answer them as soon as I can! Happy cooking!!!


PIN THIS POST

HEALTHY GRAB AND GO BREAKFAST EGG MUFFINS 2 WAYS - LOW CARB & VEGETARIAN OPTION

As someone who thrives on being a busy body, I often forget to eat or worse, go after items high in carbs and sugar as a way to sustain my energy and curb my cravings. Knowing this, I decided to make some delicious, healthy, grab and go egg bites that I can batch make and store in the fridge for easy access throughout the week. This has totally helped me choose better snacking foods and its super easy to just warm up quickly in the microwave before I head out the door. I love them in the morning or after a workout and they are packed full of protein and veggies so you can have two or three completely guilt free!

Hope you like them!

INGREDIENTS:

- Makes 12 Servings -

Butter to Greece Baking Sheet
!2 Large Eggs
1 Small Sweet Onion - chopped roughly
Salt and Pepper To Taste

- For 6 Muffins Italian Style -
1/4 Cup of Freshly Grated Mozerella
5-6 Cherry Tomatoes, Sliced
3-4 Strips of Prosciutto

- For 6 Muffins Greek Vegetarian Style -
1/4 Cup of Grated Halloumi
1/4 Cup of Crumbled Feta Cheese
A handful of Freshly Washed Spinach

DIRECTIONS:

Preheat oven to 350.

Greece baking tray wel.

Mix eggs, onion, salt and pepper in a large bowl and whip together.

Pour mixture into baking tray till each muffin cup is 1/2 way full.

Add in ingredients for both the Italian and Greek style.

Bake for 25-30 minutes until the tops brown slightly.

Remove and let sit for 10 minutes before trying to remove them from the tray.

Enjoy!

P.s You can store these eggs muffins in the fridge for 3-4 days in a ziplock bag or sealed container and warm up in the microwave for an easy grab and go snack!!


If you like this recipe or have any comments/questions, feel free to leave them in the comment section below!


PIN THIS POST