CLASSIC ITALIAN BRUSCHETTA RECIPE

italian brushcetta recipe_-3.jpg

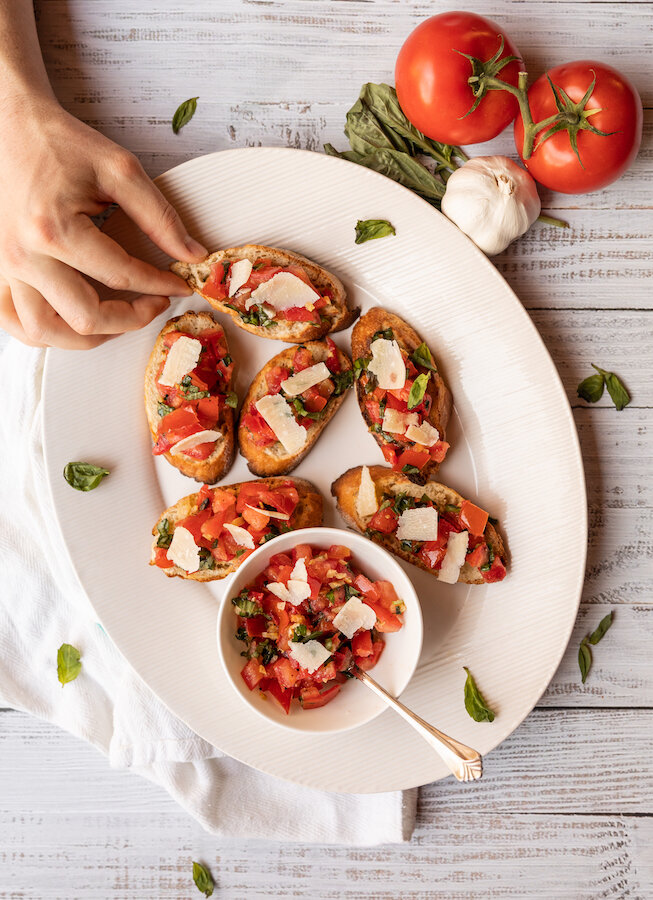
A classic Italian Bruschetta Recipe with Cheese

Italian cuisine has always been one of my favorites. When I was little my mom took my brother and I to Italy for the summer and we stayed in this villa outside the small medieval town of Montalcino, smack in the middle of Tuscan wine country. The villa was owned by a winemaker and farmer and was situated on the edge of his vast property. I remember running through the rows of grapevines, chasing sheep, and stomping buckets of grapes for fun. A child's dream playground and also the place I was first introduced to Italian cuisine (at least as far back as I can actually recall) and believe me it was love at first taste!

Bruschetta is a typical antipasto that comes before your meal and opens up your stomach for the usual large plant of pasta to follow. I am a huge fan of a classic tomato bruschetta and making it at home quite often. Not only is a classic bruschetta actually quite easy and straightforward to make but it also takes no time at all. If you are looking for an easy authentic Italian bruschetta recipe to make for your next meal, check out my bruschetta recipe below!

INGREDIENTS:

Serves 3-4 as an appetizer

1/4 Cup of Extra Virgin Olive Oil
2-3 Cloves of Garlic (if you like garlic put more... obviously) - minced
3 Tomatoes (I use vine tomatoes) - remove seeds and chop into pinkie nail size bits
1/3 Cup of Chopped Fresh Basil Leaves
Salt and Pepper to taste
French Baguette - Cut into pieces
Parmasan Cheese - optional garnish


CRAVING ITALIAN FOOD? CHECK OUT THESE OTHER DELICIOUS ITALIAN RECIPES!


HOW TO MAKE AN AUTHENTIC ITALIAN BRUSCHETTA!

In a small skillet, heat up extra virgin olive oil on medium - low heat. When ready, add in the garlic and allow to cook until aromatic and translucent (about 2-3 minutes). Remove from heat.

In a bowl, add your garlic and olive oil, chopped tomatoes, and basil. Sprinkle with salt and pepper to taste. Mix thoroughly and set aside.

italian brushcetta recipe_-4.jpg

An authentic Italian bruschetta with cheese

Cut the baguette into 1/2 inch slices and brush with olive oil on one side. Place them on a baking sheet, olive oil side up, and broil them in the oven until they start to brown (like toast). Once out of the oven dress the baguette with the bruschetta ingredients in the bowl.

Garnish with some more chopped fresh basil or parmesan cheese if you like and it is ready to serve!

italian brushcetta recipe_-2.jpg

An authentic Italian bruschetta with cheese

CHECK OUT THIS VIDEO ON HOW TO MAKE BRUSCHETTA


FOLLOW ME ON INSTAGRAM @ISTHATSOH


I hope you enjoyed this easy Italian bruschetta recipe. If you did please tell me about your experience in the comments below. If you want me to try something else I am always up for suggestions!!!!

PIN THIS POST

SHAMROCK MATCHA FUDGE

With spring now on the horizon I am looking forward to good weather and celebrating Easter and St. Patrickโ€™s Day in March. To help me get in the festive spirit I decided to whip up some white chocolate fudge with a matcha dessert twist to help it not only turn green but become a perfect St. Patrickโ€™s Day dessert. Although they are as delicious and can easily be cut into matcha squares, I decided to take the theme a little further using my little shamrock cookie cutter to achieve these adorable shamrock match fudge morsels. If you are a matcha lover or looking for new ways to use Matcha powder, you are going to love this St. Patrickโ€™s Day Recipe. But donโ€™t take my word for it, try for yourself. Enjoy!

* Please Note - Some links in this post may be affiliate links *

INGREDIENTS:

Apx 16 Shamrocks

3/4 CUP of Condensed Milk
1.5-2 TBSP of Powdered Matcha - depending on how strong you want the matcha flavour
14 oz White Chocolate
1/2 TSP of Salt
1 TSP of Vanilla Extract
1 TBSP of Matcha for decorative dusting at the end

You will also need:
1.5 Inch Shamrock Cookie Cutter
8x8 Baking Pan
Parchment Paper
A Fine Sifter
Spatula


OTHER NOTEWORTHY DESSERT RECIPES


DIRECTIONS:

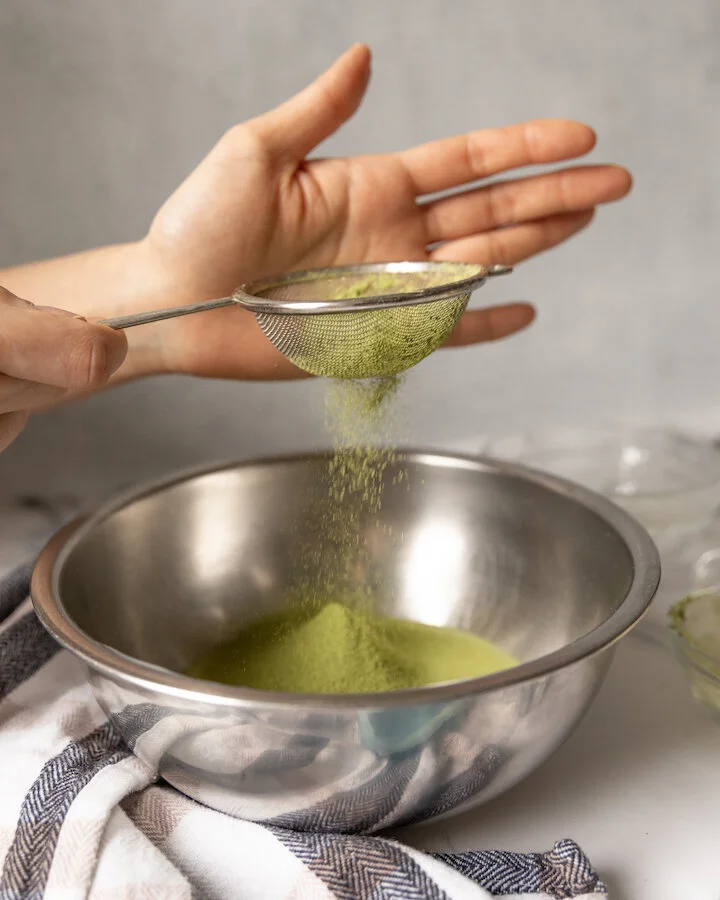
Pour condensed milk into a bowl and sift in your matcha.

Using a double boiling method, stir the matcha into the condensed milk until it is well incorporated on a medium low heat.

Next, add in the white chocolate and continue to double boil until it has melted completely and is well mixed.

Next, add in your salt and vanilla, stir.

Pour mixture into lined baking pan and store at room temperature for 15 minutes before moving to the fridge for an additional 3 hours.

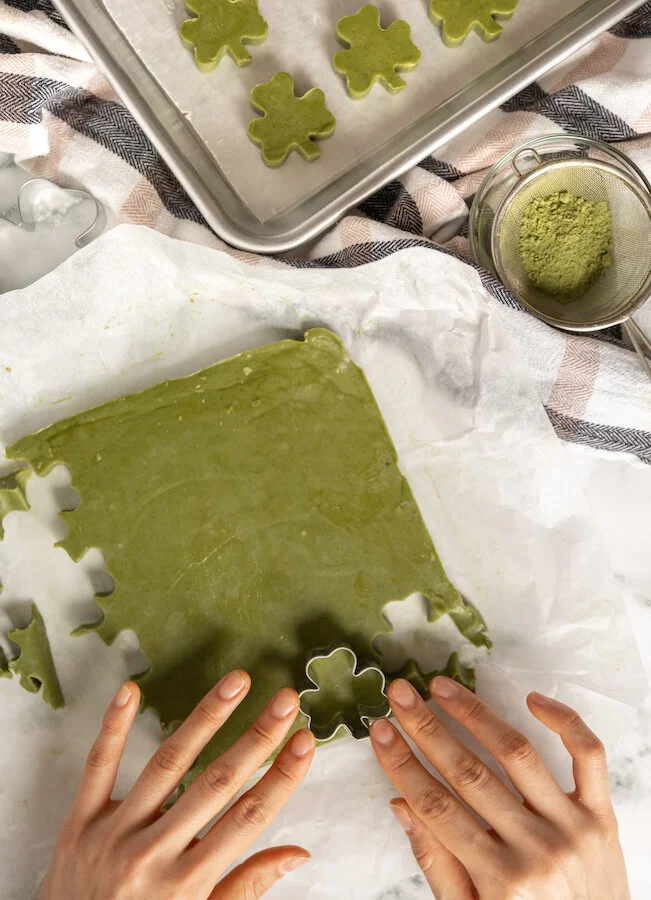
When fully cooled, cut out shamrock shapes using your cookie cutter and place on a non stick surface.

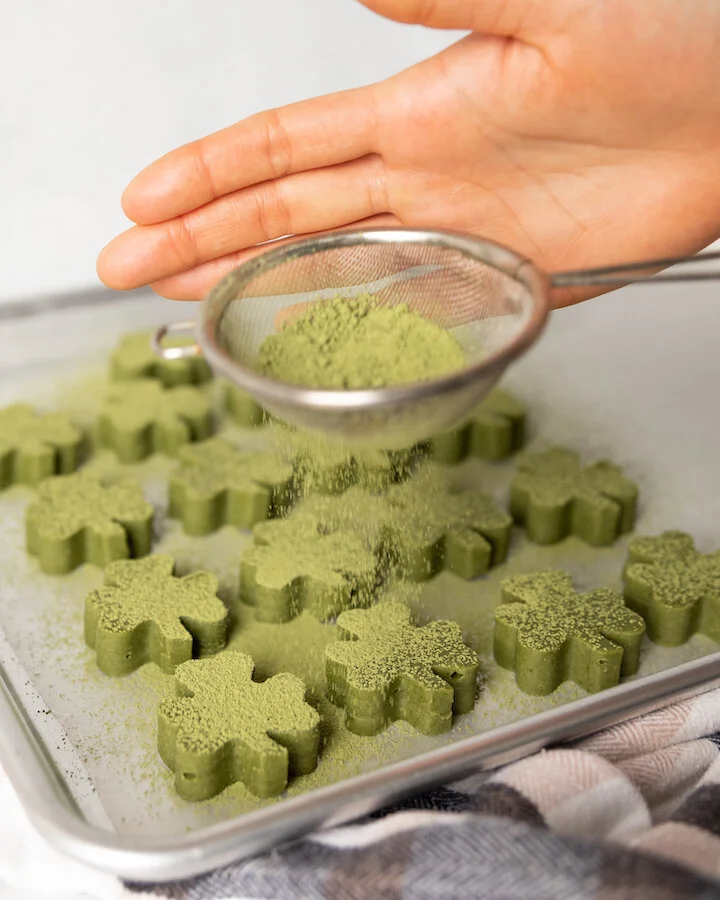
Sprinkle with more sifted matcha.

Store in fridge until you are ready to eat.

Enjoy!

These can be packaged and left in the freezer for a month.


FOLLOW ME ON INSTAGRAM @ISTHATSOH


I hope you enjoyed this recipe as much as I do. If you have any comments please leave them below and I'll be happy to answer them as soon as I can! Happy cooking!!!


PIN THIS POST

S'MORES COOKIES IN A JAR

Friendly reminder, you donโ€™t need to spend a million dollars to show loved ones that you care about them this holiday season. Instead, give them a gift that is both homemade and personalized like that of some freshly baked sweets!

I for one love receiving homemade cookies or handmade gifts during the holiday season and one such gift I love to not only give but receive is โ€˜cookies in a jarโ€™. This year, wow your friends with this festive sโ€™moreโ€™s cookies recipe! No matter if you decide to bake them yourself or give a jar of cookie mix to someone as a gift, these cookies are sure to impress everyone on your list!


INGREDIENTS:


You will need 1L jars! Each jar yields approximately 9-10 cookies!

- FOR THE JAR -
1.75 CUPS of All-Purpose Flour
1 TSP of Cornstarch
1/2 TSP of Baking Soda
1/2 TSP of Salt
1/3 CUP of Brown Sugar
1/4 CUP of Granulated Sugar
1/4 CUP of Semi-Sweet Chocolate Chips
4-5 Graham Crackers
1 Cups of Mini Marshmallows
9 Hersey Pieces


- FOR BAKING -

1/2 CUP of Salted Butter
1 Egg
1/2 TSP of Vanilla


CHECK OUT THESE OTHER FESTIVE DESSERTS


DIRECTIONS:

When building the cookie mix jar, first make sure they are clean and dry inside.

Mix all-purpose flour, cornstarch, baking soda, and salt in a bowl, and then dump it into the jar using a paper funnel and packing it down.

Next dump in your Brown sugar, followed by your granulated sugar, and topped with the semi-sweet chocolate chip to create three additional layers.

Next, add a layer of cling wrap followed by your graham crackers, marshmallows, and Hershey bars. You want to do this so that they can be easily removed from the jar and separated from the mix when your recipient is ready to make the cookies.

Seal the jar and decorate as desired.

Make sure while decorating the jar to add a tag with the following instructions on how to bake the cookies:

- Preheat oven at 350
- Add 1/2 Cup of Salted Butter, 1 Eggs, and 1/2 TSP of Vanilla to a large bowl and beat until well combined.
- Open the jar and removed the top layer that is wrapped in cling wrap - set aside
- Dump the remainder of the jar in with butter and egg mixture and blend till cookie dough starts to form.
- Break graham crackers up and add 2/3 of broken crackers and 2/3 of mini marshmallows to the dough, folding it in. *You will want to save the remaining 1/3โ€™s for garnish!
- Line a baking tray with parchment paper and create dough balls 2-3 TBSP in size and bake for 8 -10 minutes or until almost done, before removing the cookie trays from the oven, garnish with the remaining graham crackers, marshmallows, and pieces of the Hersey chocolate, and return to oven for an additional 2 minutes. (If desired, switch the oven to broil and toast the marshmallows on top. Just be sure to watch them because the small marshmallows burn quickly!)
- Cool for 2-3 minutes on a wire cooling rack before eating or storing in an airtight container.


FOLLOW ME ON INSTAGRAM @ISTHATSOH


I hope you enjoyed this recipe as much as I do. If you have any comments please leave them below and I'll be happy to answer them as soon as I can! Happy cooking!!!

PIN THIS POST

Smores.jpg

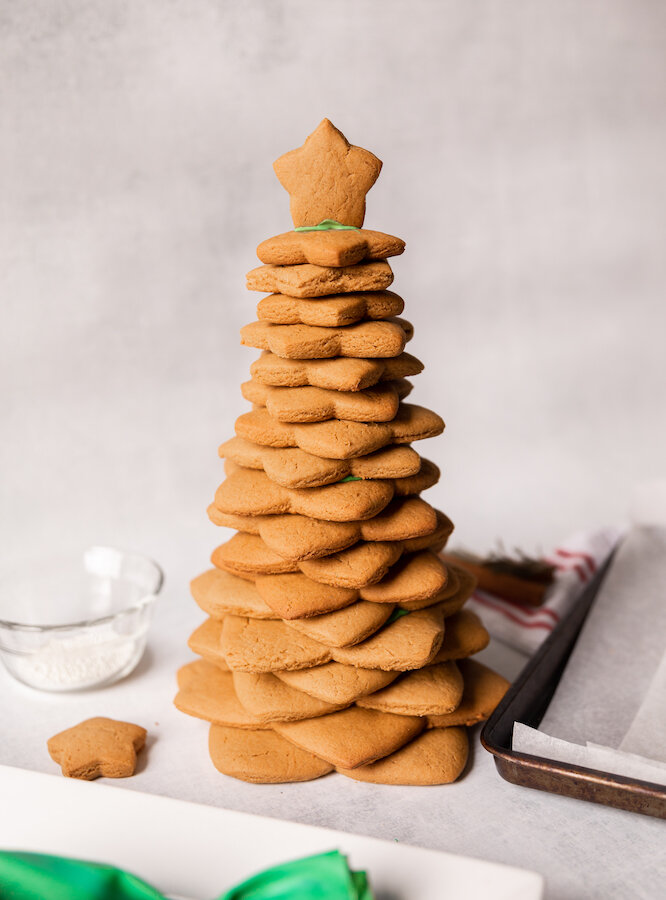
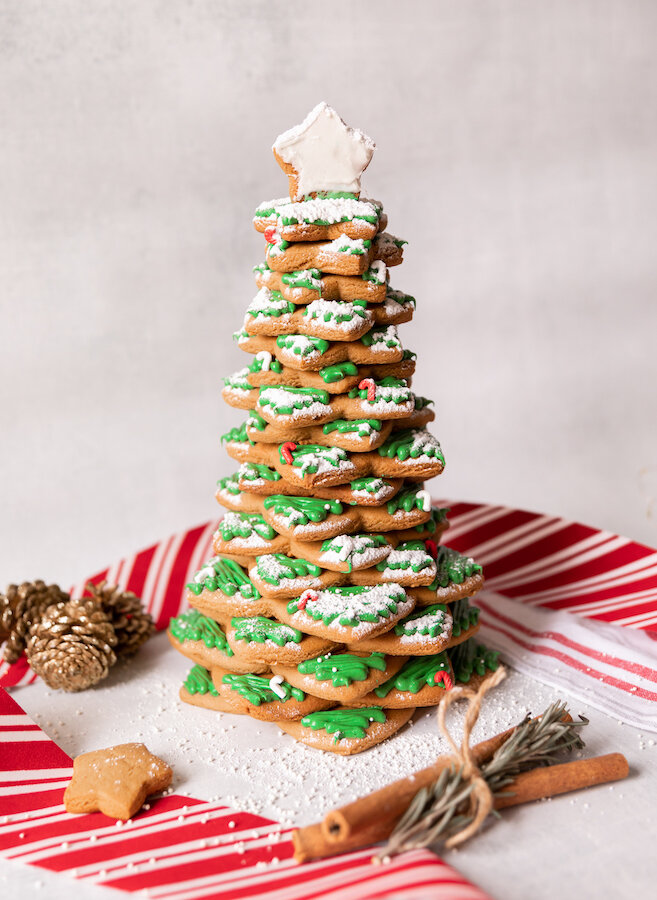
3D GINGERBREAD CHRISTMAS TREE

* Please Note - Some links in this post may be affiliate links *

Level up your dessert table this year with this 3D Gingerbread Christmas Tree! It is not only so fun to make but it is also the perfect centerpiece at Christmas dinner. If you are looking for something to do that not only fill the house with the best smell (HELLO GINGERBREAD COOKIES!!) but is also a great activity the whole family can get involved in, this is it!

Happy Holidays my friends!


FOLLOW ME ON INSTAGRAM @ISTHATSOH!


INGREDIENTS:

Makes 1 Christmas Tree

- Gingerbread Cookie Recipe -
2/3 of a CUPS of Butter (unsalted) - softened
2 CUPS of Granulated Sugar
2 Large Egg - at room temperature
2/3 of a CUP of Fancy Molasses
5.5 CUPS of Flour (All Purpose)
3 TSP of Ginger
2 TSP of Cinnamon
1 TSP Baking Soda
1/2 TSP Ground Cloves
Large Pinch of Salt

- Decorations -
Cookie Icing - White, Green, Red are traditionally used
Sprinkles
Icing Sugar

- Tools -
10 PC Christmas Star Cookie Cutter - I found mine on Amazon and it arrived in 2 days! *Please note I did not use all 10 stars, I started from the smallest and worked my way larger. If you want to use all 10 stars (and have a massive tree) you will need to double your gingerbread cookie ingredients)
Wax Paper
Parchment Paper
Baking Tray
Icing Piping Bag and Decorative Tips


CHECK OUT THESE OTHER FESTIVE RECIPES

DIRECTIONS:

Blend softened butter and sugar together until fluffy. Add in your egg and fancy molasses.

In a separate bowl mix your flour, ginger, cinnamon, baking soda, ground cloves, and salt. Whisk until well mixed.

Slowly start to add your flour mixture into your butter mixture until a dough starts to form. You may want to finish it off with your hands.

Make two dough balls from the mixture and wrap them in plastic wrap before placing them in the fridge for an hour.

After an hour, remove the dough balls from the fridge and let them rest for 10 minutes before rolling them out to 1/4 inch thickness. I used my clean countertop to roll the dough out and placed wax paper on top of the dough for easy rolling.

Preheat oven to 350.

Cut out 2-3 cookies of each size (starting from smallest and working your way larger) of the Christmas Star and place them on a baking tray lined with parchment paper. Place each shape 1/2 - 1 inch apart because the cookies do spread out and puff up a little. I didnโ€™t use all 10 of my stars (I think I stopped at 7) as I didnโ€™t want my tree to be too big.

Bake for 11 minutes.

Remove from oven and allow to cool down before stacking them from the largest size to the smallest size. Use a little bit of icing when stacking to help hold them in place and level them out.

When you get to the final star cookie use icing to stick it to the top standing up to create a Christmas tree star!

Decorate as desired.

Allow to dry/harden in a safe place and store at room temperature.


I hope you enjoyed this recipe as much as I do. If you have any comments please leave them below and I'll be happy to answer them as soon as I can! Happy cooking!!!


PIN THIS POST

MY GRANDMOTHERS EASY OLD FASHIONED APPLE CRISP RECIPE! THE PERFECT THANKSGIVING DESSERT!

Apple season is upon up which means Iโ€™m getting request left, right, and center from my family to make some of our household fall favorites including my grandmothers old fashioned apple crisp recipe! Itโ€™s the perfect and easiest dessert to make if you are having a small gathering and is always a crowd please, not to mention its super delicious! If youโ€™re looking for a dessert that gives you all the fall feels and is sure to be a hit, this is it!

Enjoy!

INGREDIENTS:

Serves 10-12 People

Crumble Topping
1.5 Cups of Flour
2 Cups of Old Fashion Oats
1.5 Cups of Brown Sugar
1/2 TSP of Salt
1.5 TSP of Cinnamon
1 Cups of Cold Butter - grated

Apple Filling
12 Granny Smith Apples - Peeled and cut into pieces
1.5 TSP of Cinnamon
1/2 TSP of Salt
1/2 a Cup of Granulated Sugar
1 TSP of Vanilla

Butter - to coat your baking tray or casserole dish ( I used a 13x9 Inch casserole dish)

DIRECTIONS:

Preheat oven at 375 degrees.

Butter your baking tray or casserole dish with butter.

In a large bowl, mix your crumble topping ingredients together and using your hands, mix ingredients together until butter feels evenly spread throughout and the flaky dry flour texture is gone. About 5-6 minutes. When done, place in fridge to keep cold.

In another large bowl, add in your apple filling ingredients and mix using clean hands. Apple slices should be evenly coated in all ingredients.

When ready, dump apple filling into buttered casserole dish, cover with crumble and place in oven to bake for 45-50 minutes or until you start to see the top turn golden brown and the juice from the apple filling to bubble up the sides.

When ready, remove and allow to cool for 5 minutes before serving either alone or with a slice of vanilla ice cream.

Enjoy!


FOLLOW ME ON INSTAGRAM @ISTHATSOH


I hope you enjoyed this recipe as much as I do. If you have any comments please leave them below and I'll be happy to answer them as soon as I can! Happy cooking!!!


PIN THIS POST