PERSIAN COOKING - KASHKE BADEMJAN RECIPE! VEGETARIAN EGGPLANT DIP

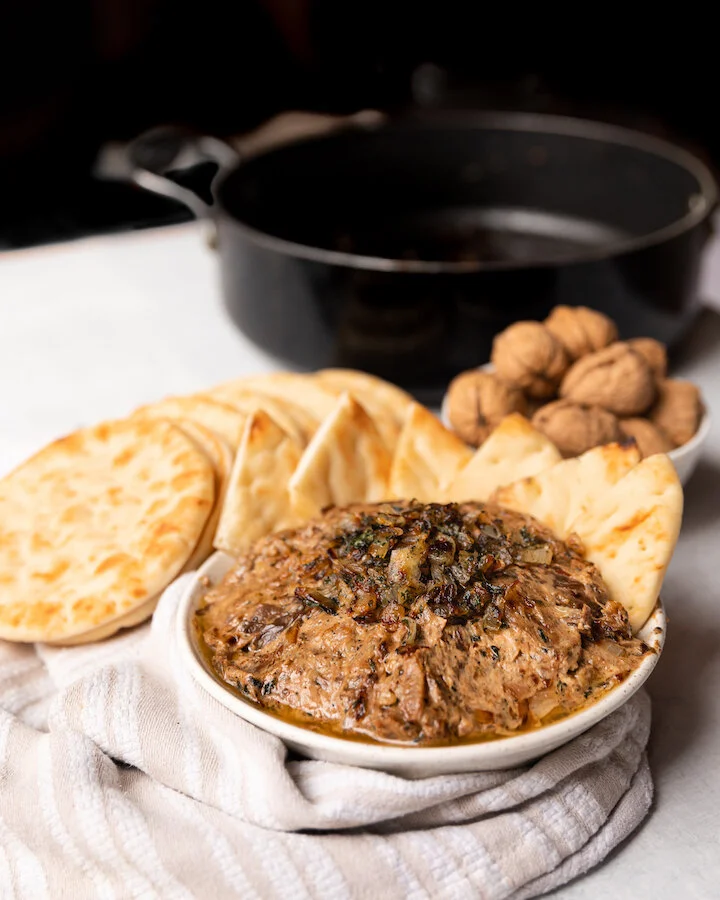
KASHKE BADEMJAN (pronounced Cash-kay Bad-em-jan) is a traditional Persian eggplant dip that accompanies meals and is always a favorite amongst my guest. Bademjan literally translates into eggplant in Farsi while Kashka refers to a type of middle eastern dairy. Usually served a little warm or room temperature, this Persian eggplant dip or side dish should always be accompanied by toasted pita or flatbread wedges. I recently made kashke bademjan for a dinner party I had at my sister’s house in Los Angeles and as you can guess, it was a total crowd pleaser. If you are a Vegetarian, love Persian food, or are just a big fan of eggplants then I highly recommend you try this kashke bademjan recipe!

KASHEK BADEMJAN can also easily be made GLUTEN FREE if you serve it on a gluten free pita equivalent or vegan if you do not add the yogurt.

For my dinner party, I made a serving of this for about 6 people. This recipe yields enough for each person to have a really nice size dollop! 

PS Don’t forget to watch the video at the bottom if you need extra help!

INGREDIENTS:

6 Chinese Eggplants or Italian Eggplant - cut lengthwise into 1/4 inch strips (if you can’t find Italian or Chinese eggplant you can use regular eggplant too)
1 Cup of Vegetable Oil - divided in 4TBSP portions
4-5 cloves of Garlic minced
1.5 Large White or Sweet Onion chopped
2/3 Cup of Water
1 TSP Salt
1 TSP Pepper
1/2 TSP Cayenne Pepper
1/2 Cup of Walnuts - chopped (I bought them already chopped at the store to avoid needing a food processor)
1 TBSP dried Mint leaves
1 Cup of Plain Greek Yogurt (optional)
Pita Bread


CHECK OUT THESE OTHER DELICIOUS RECIPES FOR SIDE DISHES!


DIRECTIONS:

Start off by adding about 4 TBSP of oil to your skillet. Heat up the oil at medium heat and then add a single layer of eggplant. Cover and let cook for about 6 minutes. Keep an eye on the eggplant so that they don't burn. Once they are browned flip to the other side and let cook for an additional 3-4 minutes or until they are brown as well. Remove cooked eggplant from skillet and onto a side dish. REPEAT until this step until all the eggplant is fried.

In the meantime get another skillet and add about 3 TBSP of oil to it. Let it heat up at medium heat for a minute and once the oil is hot add the chopped onions. Let the onion cook it they become a nice golden (caramelized) colour. This may take several minutes but stir often so they do not burn.

Once all the eggplant is finished and removed from the first skillet add the spices and the garlic to the skillet. Let the garlic cook for a minute making sure to stir it around and coat the bottom of the skillet. Also make sure that the temperature is still on medium so you do not burn the garlic. After a minute add back in the eggplant and mix together. Once mixed add in the water and cover. Let this simmer for about 15-20 minutes or until the eggplant becomes soft and the water evaporates. You may notice that there is a lot of oil that has seeped out the of eggplant, you can drain a spoonful or two out.

In the other skillet the onions should start to look nice and golden. Once the onion is ready remove it from the heat and add in the dried mint. Make sure to crush the dried mint with your hands as you add it in to release/activate the mint smell. Mix in the mint with the onions. *I would remove 2-3 TBSP of this to use as a garnish later.

If you didn’t buy walnuts already chopped, add you walnuts to your food processor and chop them till they are fine but still crunchy (do not over do it otherwise they will become a paste or nut butter)

When the eggplant is nice and tender remove it from the heat and add in the onion, mint and walnuts and stir. 

If you are Vegan you are finished.

If you want to continue with the dairy stir in the Greek yogurt until it is fully blended.

Transfer the mashed eggplant to a serving bowl, add the onion garnish you set aside earlier and serve at room temperature with toasted pita or flat bread.


FOLLOW ME ON INSTAGRAM @ISTHATSOH


Thanks for joining me today! I hope you enjoyed this Kashke Bademjan recipe as much as I do. If you have any questions or comments about this persian eggplant dip recipe, please feel free to leave them in the comments below and I will try and answer them as soon as I can!


PIN THIS POST!

CLASSIC ITALIAN BRUSCHETTA RECIPE

italian brushcetta recipe_-3.jpg

A classic Italian Bruschetta Recipe with Cheese

Italian cuisine has always been one of my favorites. When I was little my mom took my brother and I to Italy for the summer and we stayed in this villa outside the small medieval town of Montalcino, smack in the middle of Tuscan wine country. The villa was owned by a winemaker and farmer and was situated on the edge of his vast property. I remember running through the rows of grapevines, chasing sheep, and stomping buckets of grapes for fun. A child's dream playground and also the place I was first introduced to Italian cuisine (at least as far back as I can actually recall) and believe me it was love at first taste!

Bruschetta is a typical antipasto that comes before your meal and opens up your stomach for the usual large plant of pasta to follow. I am a huge fan of a classic tomato bruschetta and making it at home quite often. Not only is a classic bruschetta actually quite easy and straightforward to make but it also takes no time at all. If you are looking for an easy authentic Italian bruschetta recipe to make for your next meal, check out my bruschetta recipe below!

INGREDIENTS:

Serves 3-4 as an appetizer

1/4 Cup of Extra Virgin Olive Oil
2-3 Cloves of Garlic (if you like garlic put more... obviously) - minced
3 Tomatoes (I use vine tomatoes) - remove seeds and chop into pinkie nail size bits
1/3 Cup of Chopped Fresh Basil Leaves
Salt and Pepper to taste
French Baguette - Cut into pieces
Parmasan Cheese - optional garnish


CRAVING ITALIAN FOOD? CHECK OUT THESE OTHER DELICIOUS ITALIAN RECIPES!


HOW TO MAKE AN AUTHENTIC ITALIAN BRUSCHETTA!

In a small skillet, heat up extra virgin olive oil on medium - low heat. When ready, add in the garlic and allow to cook until aromatic and translucent (about 2-3 minutes). Remove from heat.

In a bowl, add your garlic and olive oil, chopped tomatoes, and basil. Sprinkle with salt and pepper to taste. Mix thoroughly and set aside.

italian brushcetta recipe_-4.jpg

An authentic Italian bruschetta with cheese

Cut the baguette into 1/2 inch slices and brush with olive oil on one side. Place them on a baking sheet, olive oil side up, and broil them in the oven until they start to brown (like toast). Once out of the oven dress the baguette with the bruschetta ingredients in the bowl.

Garnish with some more chopped fresh basil or parmesan cheese if you like and it is ready to serve!

italian brushcetta recipe_-2.jpg

An authentic Italian bruschetta with cheese

CHECK OUT THIS VIDEO ON HOW TO MAKE BRUSCHETTA


FOLLOW ME ON INSTAGRAM @ISTHATSOH


I hope you enjoyed this easy Italian bruschetta recipe. If you did please tell me about your experience in the comments below. If you want me to try something else I am always up for suggestions!!!!


PIN THIS POST

ROASTED POTATO TOWERS WITH THYME AND GOAT CHEESE!

When planning for a dinner party it’s important to make sure that whatever you are serving matches or has a progression. This recipe for roasted potato towers, although not complicated in terms of flavor profile, make a really appetizing side dish and pairs well with meats, pasta, and even some seafood dishes like scallops!

INGREDIENTS:

Makes 6 Servings

4-5 Yukon Potatoes - thinly sliced (about 1/8 inch thick)
7 TBSP Butter - melted
1 TBSP of Fresh Thyme - removed from stems
Coarse Salt and Cracked Pepper (to taste)
Goat Cheese

- Cooking Items-
Muffin Tin
Baking Tray
Aluminum Paper


CHECK OUT THESE OTHER DELICIOUS SIDE DISHES!


DIRECTIONS:

Preheat the over to 350 degrees.

Place the cut up potato slices into a large the bowl. Add the butter, thyme, salt, and pepper and mix together so the potatoes are well coated.

Take a muffin tray and butter the tray. In a circular motion start to stack the potatoes into tower form. TIP: Use the smaller pieces at the bottom of the muffin tray and the larger slices at the top.

Cover the tray with aluminum foil and bake in the oven for 30 minutes.

After 30 minutes take the cupcake tray out of the oven and turn the heat up to 450.

Next, we are going to flip the potato towers, aluminum foil and all, over onto a baking tray and remove the muffin tray. When you have successfully completed this step and fixed your towers so they stand up straight again (don’t worry it happens to all of us) place the tray back into the oven for an additional 15 minutes until they cook and become more crispy.

When they are nice and crispy take them out of the oven and add a dollop of goat cheese to the top (or if you want them to be really pretty pipe goat cheese onto them with an icing piper!), followed by a small piece of thyme for garnish.

Serve while hot!

Enjoy!


I hope you enjoyed this recipe as much as I do. If you have any comments please leave them below and I'll be happy to answer them as soon as I can! Happy cooking!!!


FOLLOW ME ON INSTAGRAM @ISTHATSOH


PIN THIS POST

Potato Towers.jpg

FRUIT SALAD

I like making fruit salad and keeping it in the fridge. Sometimes its hard to eat all the fruit you buy and this is a great way to get you reaching for them as a snack instead of chips or chocolate. I also find that if you take the prep out of it and all the fruit is already washed and cut kids/tennagers will eat more for it too. I also like to use it as topping on some granola and yogurt in the morning or even on pancakes as a substitute for syrup. It may seem like a pretty easy idea but some people add orange juice and liqueur but I dont think that's needed.

INGREDIENTS:

Berries - mix of any kind you like (I used blueberry, blackberry and raspberry)*
1 Can of Peaches slices in light syrup (796 ml) (Chopped Small but keep syrup)
1 Apple (Chopped Small)
1/4 Cantaloupe (Chopped Small)

*You can add any fruit you like, I would of added strawberries and pears as well but the ones at the stores weren't very good


DIRECTIONS

Open canned peaches and pour out the syrup into a large bowl - this will be your base.

Cut the peaches that remain in the can into smaller pieces.

Wash the berries and add them to the cut up peaches and syrup.

Cut up cantaloupe into small pieces as well as apple. Add it to the bowl - mix and serve.


I hope you enjoyed this recipe as much as I do. If you have any comments please leave them below and I'll be happy to answer them as soon as I can! Happy cooking!!!

GREEN BEAN SALAD - VEGAN AND VEGETARIAN FRIENDLY

I like eating salad but I get board of it after awhile. I find that sometimes I don't feel as full as I would like or I need more of a crunch! Green beans are a very good source of minerals and a great lettuce replacement. This salad is quiet easy to make and can easily be taken to work for a healthy lunch option. ENJOY!

Yields One Portion

INGREDIENTS:

1-2 Handfuls of Green Beans - Ends taken off
1 to 2 Tomatos - Chopped
Half a small Red Onions - Chopped
Olive Oil
Balsamic Vinegar
Salt and Pepper to taste

DIRECTIONS:

Steam the green beans for 5 minutes, drain and add to cold ice water bath to stop them from cooking.

While the green beans are steaming add the tomatoes and red onions to a flat-ish bowl so that they can sit and slightly soak in olive oil and balsamic vinegar. Next addsome salt and pepper stir it in and let it continue to sit and marinate.

Drain green beans and add into bowl with tomatoes and onions. Mix and serve.


I hope you enjoyed this recipe as much as I do. If you have any comments please leave them below and I'll be happy to answer them as soon as I can! Happy cooking!!!