Happy Victoria Day long weekend to all my fellow Canadians!
To help you kick off this weekends celebrations, I wanted to share three skinny cocktail recipes using Nude Beverages Vodka Seltzer.
If you are not familiar with Nude Beverages they are hard seltzer company from Britsh Columbia, Canada that uses clean alcohol bases along with all-natural flavors. All Nude Hard Seltzer beveraegs have 100 calories and 0 carbs per serving. In addition to Nude Vodka Soda, they also offer Nude Tequila Soda and Nude Gin Soda however only the Nude Vodka Soda (which comes in three flavours, Peach, Raspberry Lemon, Classic Lime, and Black Cheery) is currently available at the LCBO in Ontario.
I have been having a lot of fun experimenting with all the different flavours and making delicious vodka seltzer cocktails so that I can share it with you including a nude ice tea! Which vodka seltzer skinny cocktail would you make?
* Please Note - Although the video below was sponsored, this post was not! *
INGREDIENTS:
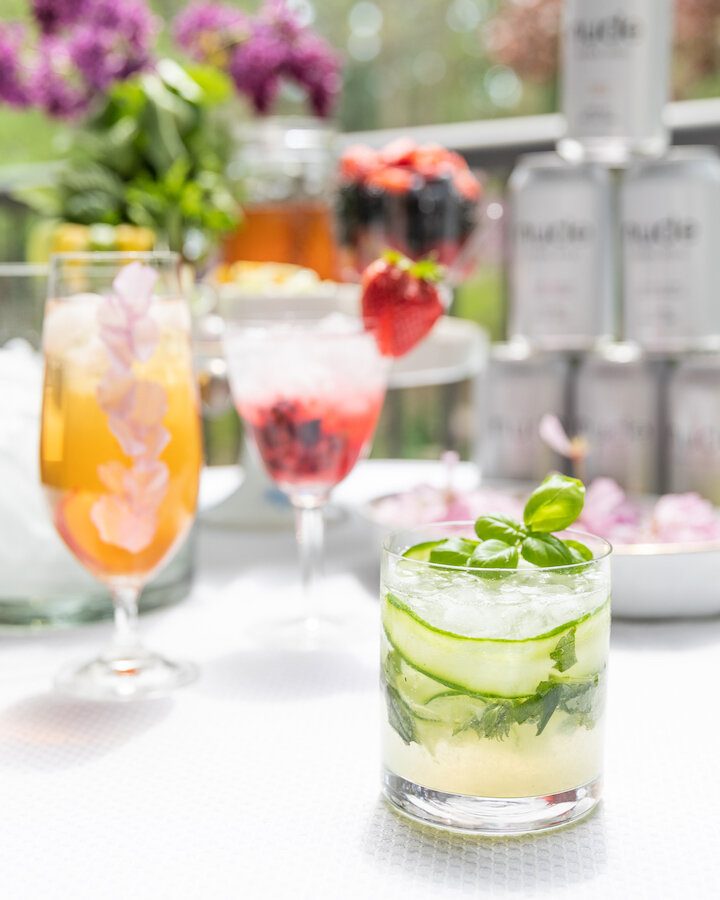
Skinny Cucumber Basil Gimlet
2-3 Mini Cucumbers - Shaved
A handful of fresh basil
Lime Juice (1/2 oz Per cocktail)
Nude Vodka Soda in the flavor ‘Classic Lime’
Mix Berry & Mint Caipiroska
A mix of muddled berries (blueberries, strawberries, blackberries and raspberries
A handful of fresh mint
Lime Juice (1/2 oz Per cocktail)
Nude Vodka Soda in the flavor ‘Raspberry Lemon’
Whole strawberry for garnish
Twisted Georgia Peach UnSweetened Ice Tea
Ice Tea (brew the night before for maximum flavour)
Nude Vodka Soda in the flavor ‘Peach’
Slices of Peach for garnish
CHECK OUT THESE OTHER COCKTAIL RECIPES

DIRECTIONS:
Skinny Cucumber Basil Gimlet Vodka Seltzer Skinny Cocktail
Add cucumber shaves, torn up fresh basil and 1/2 oz of Lime Juice to your glass and muddle together.
Next, decorate the Glass with more cucumber shavings
Add Ice (i used crushed ice which I made by putting ice in a plastic ziplock bag and hitting it with a meat mallet!)
Top it off with Nude Hard Seltzer using the Nude Vodka Soda in the flavor ‘Classic Lime’
Garnish with Basil

Mix Berry & Mint Caipiroska Vodka Seltzer Skinny Cocktail
Add one or two spooms of your berry smash to a glass (I literally just muddled a few different kinds of berries together), followed by 1/2 an Oz of lime juice and a few sprigs of fresh mint. Muddle together.
Add ice (I used crushed ice which I made by putting ice in a plastic ziplock bag and hitting it with a meat mallet!)
Top it off with Nude Hard Seltzer using the Nude Vodka Soda in the flavor ‘Raspberry Lemon’
Garnish with a strawberry

Twisted Georgia Peach UnSweetened Ice Tean Vodka Seltzer Skinny Cocktail
Add Ice Tea (I brewed mine the night before for maximum flavour)!
Add ice
Top it off with Nude Hard Seltzer using the Nude Vodka Soda in the flavor ‘Peach’
Garnish with a slice of peach!
FOLLOW ME ON INSTAGRAM @ISTHATSOH


I hope you enjoyed these three skinny cocktails using new beverages vodka seltzer as much as I do. If you have any comments about nude hard seltzer please leave them below and I'll be happy to answer them as soon as I can! Happy bartending!!!