PIRI PIRI CHICKEN WITH ROASTED VEGGIES - A PORTUGESE CHICKEN RECIPE

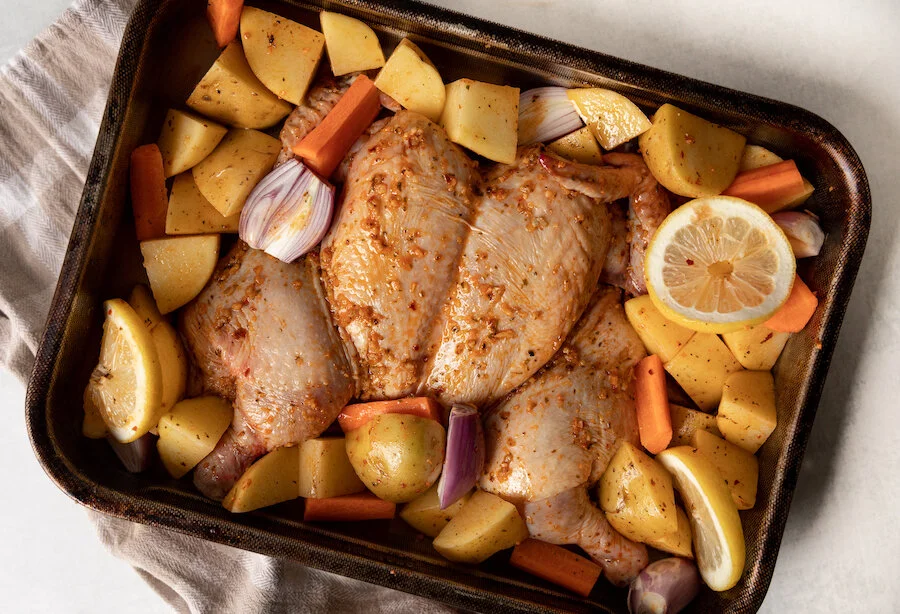
If you’re looking for something healthy and easy to make for dinner tonight that will transport you to the beautiful country of Portugal, may I suggest trying this easy Piri Piri chicken with roasted veggies? Best marinated a day in advance, this Portuguese chicken recipe doesn’t take long to make and always comes out super juicy. I love how the vegetable roast alongside the Piri Piri chicken in the excess fat to perfection until their exterior is crunchy and their insides are soft. Since Piri Piri sauce can be a little spicy and very juicy make sure to pair the chicken and veggies with a simple side like a helping of rice for a well-rounded authentic Portuguese chicken dinner.

Want to try making your own Piri Piri Mix at home? Check out Chef Mireille’s Piri Piri Spice Blend Recipe!

* Please Note - Some links in this post may be affiliate links *

INGREDIENTS:

Serves 2 people

- Piri Piri Chicken Glaze -
4 TBSP of Olive Oil
3 Garlic Cloves - pressed
2 TBSP of Piri Piri Spice Mix - For premade I like the clubhouse Piri Piri spice mix or the Farm Boy Mix however you can also check out Chef Mireille’s Piri Piri Spice Blend Recipe and make it at home!
2 TBSP of Lemon Juice
1 TSP of Lime Zest
Salt and Pepper
Whole Chicken - butterflied (mine was about 3.5 lbs) or you can use chicken thighs or quarters

- Roasted Veggies -
2-3 Yukon Potatoes - washed and cut in large pieces. I like to put my cut potato pieces in water while I prep all my ingredients so they don’t oxidize and turn colour. Drain water before use.
2 TBSP of Olive Oil
2 TSP of Piri Piri Spice Mix
Salt and Pepper
1 Large Carrot - chopped roughly
2-3 Shallots - chopped roughly
3 Lemon Slices or Wedges

- Garnish -
Parsley

- Fun Tools -
Meat thermometer


LOOKING FOR A MAIN DISH? CHECK OUT THESE OTHER RECIPES!


DIRECTIONS:

The first thing to do is marinate the chicken, preferably for a minimum of 4 hours or better yet overnight. In order to do so you must create the glaze.

Heat up the olive oil for your chicken glaze in a sauce pan and add in pressed garlic. Once they become fragrant (about 2 minutes) add in your Piri Piri spice mix, lemon juice, lemon zest, salt and pepper. Stir and set aside to cool.

Wash and dry your chicken before coating it with the glaze. Make sure to coat both sides of the chicken well before covering with plastic wrap and storing in the fridge. Alternatively, you can also do this in a zip lock bag if you can find one big enough.

When you are ready to start cooking, preheat oven to 375F on convection roast (if you don’t have the setting, roast or bake is fine) and remove your chicken from the fridge. Place chicken and all the glaze in the middle of a sheet or roasting pan.

Next, toss your potatoes in olive oil, Piri Piri mix, and salt and pepper until evenly coated. Place potatoes in the sheet pan surrounding the chicken along with roughly chopped carrots and shallots. Garnish with lemon slices before roasting in the oven for 45-55 minutes on the middle rack or until tender.

If you have a meat thermometer the minimum for chicken is 165. You can use it to check if the chicken is done or you can check manually by cutting into it to see if it’s pink inside. If the chicken is done and the potatoes are not, feel free to take the chicken out of the sheet pan and cover it with aluminum foil to keep warm before placing the veggies back in the oven until they become tender.

When potatoes are ready, add chicken back in and serve!

Enjoy!


FOLLOW ME ON INSTAGRAM @ISTHATSOH


I hope you enjoyed this Piri Piri Chicken Portugues chicken recipe as much as I do. If you have any comments please leave them below and I'll be happy to answer them as soon as I can! Happy cooking!!!


PIN THIS POST

MOROCCAN BROCCOLI SALAD - GLUTEN FREE, KETO & VEGAN

Packed full of antioxidants, this delicious Moroccan raw broccoli salad is both beautiful to look at and packed full of nutrients. If you, like me, are looking for ways to eat healthier without compromising on taste, this gluten free, vegan, keto broccoli salad is perfect. Since it can be prepared a day in advance and keeps well in the fridge, it also is great for meal planning or a grab-and-go snack. Not to mention it takes only a few minutes to make!

Enjoy!

INGREDIENTS:

Serves 4

- Dressing -
6 TBSP of Grape Seed Oil
1 TSP of Ras-El-Hanout Spice
1 Garlic Clove (pressed or chopped finely)
2 TBSP of Fresh Lemon Juice
2 TBSP of Balsamic Vinegar
1 TBSP of Honey (can be substituted with Agave if you are vegan)
Salt and Pepper to taste

- Salad -
6 CUPS of Broccoli Florets
1 Shallot (chopped Finely)
1 Jalapeno (chopped finely)
1/3 CUP of Dates (pits removed and chopped finely) - reduce the amount or leave out if you want more of a keto broccoli salad)
1/4 Cup of Roasted Pistachios (chopped finely)
Salt and Pepper to taste

- Optional Garnish-
1/4 CUP of Pomegranate Seeds
5-6 Slices of Pickled Beets (use sugar-free pickled beets if you want more of a keto broccoli salad)


LOOKING FOR SOME HEALTHY RECIPES? CHECK THESE OUT TOO!


DIRECTIONS:

Remove sauce pan from heat and add in lemon juice, balsamic vinegar, and honey (or agave). Salt and pepper to taste and set aside to cool.

Next, add your broccoli, shallots, dates, jalapenos and pistachios to a large salad bowl. Dress with your ras-el-hanout dressing, toss and garnish with pomegranates and slices of picked beats. Salt and pepper once again to taste.

Cover and chill if prepared in advance otherwise enjoy!


FOLLOW ME ON INSTAGRAM @ISTHATSOH


I hope you enjoyed this gluten free, vegan, keto broccoli salad recipe as much as I do. If you have any comments please leave them below and I'll be happy to answer them as soon as I can! Happy cooking!!!


PIN THIS POST

CHICKEN PUTTANESCA - LOW CARB KETO FRIENDLY MEALS

Most often seen in its pasta form, puttanesca originated in Naples, Italy, and is said to be a sauce created by the ladies of pleasure. One story told is that the ladies would visit restaurants at the end of the night and they would ask for leftover ingredients. These ingredients would all go into one pot to create this salty, vibrant sauce. Today, the sauce is most often found made from tomatoes, black olives, capers, anchovies, onions, and garlic, and served commonly on pasta.

I, however, have been trying to stay low carb since starting Keto and decided to skip the pasta and use cauliflower rice instead. The results were fantastic and the saltiness of the sauce was perfect. Further, the chicken was tender and just fell off the bone.

If you are looking for a great, low carb meal this one is sure to be a hit!

Enjoy!

INGREDIENTS:

- Serves 2-3 people

3LBS of Chicken Thighs or Drumsticks
Salt
2 TBSP of Olive OIl
3 Cloves of Garlic - thinly sliced
4 Anchovy Fillets in Oil
1/2 TSP of Red Chilli Pepper Flakes
2 TBSP of Concentrated Tomato Paste
1 Cup of Olives - crushed and pitted
3/4 CUP of Dry White Wine - and a little extra for drinking
2 TBSP of Capers - drained
2 Bay Leaves
Lemon Peel - 3 x 2” stripes

- Optional Bases -

Pasta
Cauliflower Rice - low carb option

DIRECTIONS:

Clean and pat dry your chicken before seasoning with salt.

In a large skillet, heat 2 TBSP of olive oil and sear the chicken, turning it occasionally until the fat and skin is a golden brown color. Once done, transfer chicken to a baking dish.

As you near the end of searing all your chicken, preheat the oven to 350.

Once done searing the chicken you will have a lot of delicious chicken bits stuck to the bottom of your skillet along with a pool of fat, remove fat from skillet, reduce heat to medium and add in your anchovies and garlic. Once the garlic is soft (about 2-3 minutes) add in your red chili flakes and tomato paste, and mix until well incorporated.

Next add in your olives, wine, bay leaves, capers, and lemon peel to the skillet. Using your wooden spoon or spatula, scrape the bottom of the pan so as to lift up all the good bits stuck to the bottom. Allow this sauce to simmer for 4-5 minutes or until most of the liquid from the wine evaporates.

Next, add 1 cup of water to the baking dish with all the seared chicken (they should be snuggled together) and add in the sauce from the skillet. Place entire baking dish in oven uncovered and allow to bake in the sauce for another 20-30 minutes

Once ready, remove from oven and serve either alone or with pasta or on a bed of cauliflower rice.

Enjoy!

NOTE: The chicken should be plenty salty from the capers and anchovies but if it is not you can always taste the sauce when it comes out of the oven and add extra salt as desired.

brighterPUT-2 copy.jpg

If you like this recipe or have any comments/questions, feel free to leave them in the comment section below!


PIN THIS POST

SPICY SHRIMP WITH CREAMY CAULIFLOWER AND SPINACH RICE - KETO & LOW CARB FRIENDLY

Since being on the Keto diet I have been experimenting a lot with carb substitutes like cauliflower rice as a way of getting the texture of carbs without the calories, and one recipe I came across that made cauliflower rice sound so delicious was a creamed version of it. Of course, being in lockdown still, I didn’t have all the ingredients the original recipe required so I remixed it my way and topped it with some spicy shrimp for a little extra kick! Needless to say, it turned out fantastic and so far I have made it twice for my family - we just can’t get enough! The creamed cauliflower made for a perfect replacement for carbs without compromising on taste at all not to mention the entire meal takes only 10 minutes to whip up! If you are looking for a delicious, low carb meal for dinner tonight, you got to try this one!

Enjoy!

INGREDIENTS:

- Serves 2-3 people

2 TBSP of Olive Oil
1 Pack of Frozen Riced Cauliflower (500grams)
1 TSP of Garlic Powder - Split into two portions
1 TBSP of Salted Butter
1 Packet of Shrimp - mine had about 20 raw shrimp, peeled and deveined
1 TSP of Paprika
1/4 TSP of Chilli Flakes
Salt and Pepper
2 Handfuls of Fresh Spinach
3 TBSP of Light Cream Cheese

- Optional Toppings -

Chilli Flakes
Green Onions

DIRECTIONS:

In a large skillet, heat up olive oil on medium/high heat. Once hot add in your cauliflower rice and garlic powder. Mix thoroughly, add salt and pepper to taste, and let cook for 4-5 minutes or until cauliflower becomes softer.

In the meantime, in another medium skillet add in butter and allow to heat up on medium/high heat. When butter is hot, drain any excess juices from shrimp before throwing them into the pan along with garlic powder, paprika, and hot chili flakes. Salt and pepper to taste. Mix spices and shrimp until the shrimp are well coated. Allow it to cook for 2-3 minutes.

Returning to the cauliflower skillet as you let the shrimp cook, add spinach and allow to wilt down by stirring it into the cauliflower rice. Once wilted, add in cream cheese and mix thoroughly.

By this time the shrimp should be ready. Plate creamed cauliflower rice adding shrimp on top and you are ready to serve!

Enjoy!

brighter-2 copy.jpg

If you like this recipe or have any comments/questions, feel free to leave them in the comment section below!


PIN THIS POST

Spicy Shrimp 2.jpg
Spicy Shrimp.jpg

RECIPE REVIEW: SHEET-PAN CHICKEN WITH CHICKPEA, CUMIN AND TURMERIC

I was first introduced to this NY Times Sheet-Pan Chicken recipe during a dinner party with a girlfriend and couldn’t get enough. I ended up taking a copy of the recipe home eager to try it myself and not only was it so easy to remake, but it tasted just as good as the first time. I love the mix of flavors and spices, and how the yogurt breaks through the acidity. If you want to make it vegetarian and just leave out the meat, I’m sure it would be just as tasty! Either way, Adam told me I can definitely make it again so not only does this recipe get my approval, but it gets his too!

Score: 4.5/5

INGREDIENTS:

 Serves 4 People

-Chicken and Chickpea-
4 LBS of Chicken (I prefer to use dark meal like thighs) bone-in and skin-on.
Lemons for lemon juice - need to yield 5 TBSP total (2 for chicken, 2 to marinate slaw, and 1 for yogurt)
1.5 CUPS of full-fat Greek yogurt
2 TSP of Turmeric (1 TSP for chicken marinade, 1 TSP for seasoning later)
1 TBSP of Fennel Seed
1 TSP of Cumin (ground)
2 Cans of Chickpeas (drained and rinsed)
1 Large Red Onion - sliced thinly
1 Mini Cucumber - sliced thinly
Olive Oil
2 TBSP Water
Salt and pepper to taste

-Toppings-
Feta (optional)
Fresh Mint - torn into small pieces

DIRECTIONS:

 Season chicken using salt and pepper before creating a marinade using 3/4 CUP of yogurt, 2 TBSP of lemon juice, 1 TSP of Turmeric, and 2 TBSP of water. Add more salt and pepper if necessary, it should be slightly salty, this will reduce once cooked and combined with yogurt topping later.

Add seasoned chicken to marinade and make sure it is coated evenly - allow to sit for a minimum of 30 minutes at room temperature or overnight in the fridge.

Prior to cooking, adjust the oven rack to the top shelf and heat oven to 450!

Next combine chickpeas, fennel seed, cumin, and the remaining Turmeric in a bowl with half the red onion slices, drizzle with olive oil and season with salt and pepper before giving it a good toss to make sure it is covered evenly. Place on a rimmed baking sheet and push chickpeas to the outer edge to make room for chicken.

Scrape the excess marinade off the chicken and place it in the center of the baking sheet. Bake in the oven for about 45-50 minutes until skin is browned. You will need to toss chickpeas occasionally to make sure they become crispy and golden and don’t burn

While the chicken is cooking create a slaw by tossing the remaining onions in a bowl with the thinly sliced cucumber and add 2 TBSP of lemon juice. Season with salt and pepper and let sit in its juice.

Once the chicken is ready, remove from oven and allow to cool slightly. Add onion cucumber slaw, to remaining yogurt and top with 1 TSP of fresh lemon juice. Season with salt and pepper to your taste. Top chicken with yogurt and garnish with mint and feta.

Enjoy!

To check out the original recipe, click HERE!


If you like this recipe or have any comments/questions, feel free to leave them in the comment section below!


PIN THIS POST